CYLON Build Nashslash.. FINISHED !

Tips, tricks, inside secrets, help, sources, items used on making the Cylon Centurion suit to wear. Tell us your story, how you came about collecting your parts to a Centurion, or if you own a complete Centurion costume.
Post Reply
User avatar
Cylon-Knight
Site Administrator
Posts: 6432
Joined: Wed Jul 23, 2008 9:32 pm
Location: Kansas City
Contact:

Post by Cylon-Knight » Mon Sep 07, 2009 11:42 am

nashslash wrote: Comments Welcome
I could only think of a one word comment!

"Perfect."


"All Baseships are now in range to attack the Colonies."
Image

User avatar
nashslash
Flight Leader
Posts: 340
Joined: Wed Apr 30, 2008 8:09 pm
Location: Milton Keynes UK

Post by nashslash » Wed Sep 09, 2009 10:20 am

Lord of the Rings......

Some Build Updates

Firstly if you think I only ever wear the same cloths...then I do when I'm doing any building painting cutting or dremmeling. I'm fed up ruining my cloths when working.

Oh well. I've finished my arms rings. They are secured using velcro and have had a small piece of foam added to each ring just to give it little more support when fastened onto my undersuit and it wont go spinning around or anything.

I also 90% finished my gauntlets too (just need to make some transfers). Again I've added some foam to them so that they fit snugly onto my arms and wont spin around during trooping or anything. On the edges of the gauntlet I've also added some chrome edging (used for cars) so that it finishes off the edge nicely and it wont scratch my arm or snag my undersuit when I'm putting it on of off.

Image

Image

Image

Boot armour. I received my new boot armour ad I've finished trimming that so that now ready to go off to VMC this weekend to be chromed. IMPORTANT TIP when trimming your boot armour make sure you do a test fit your legs calf. You don't want to get them all trimmed nicely and get them chromed only to find they wont go round your fat legs.

Image

Backpack

resecured the backpack support so that it can be mounted into the Vacuum and be chromed. This too will be dropped off at VMC this weekend.. I also drilled out the holes for securing the pipework on the back. I didn't want to drill these after it had been chromed in case I slipped or damaged the finish afterwards.

Image

Image
www.battlefield-online.net

User avatar
GoldCylon
Founder
Posts: 6948
Joined: Fri Dec 02, 2005 3:02 pm
Location: Sacramento
Contact:

Post by GoldCylon » Wed Sep 09, 2009 5:20 pm

The first thing I noticed was that trim. Nice touch on that. The chrome job looks good so far, but I thought you dropped everything except the ankle pieces off a few weeks ago. I think I need to go back and look at that past posting again. Also I take it the photos are showing defects that are not present. I see little white marks here and there that are minor, but I had a tricky time taking photos out side of the items I chromed myself. One thing I figured out on how to hide the back ground reflection was go inside, use what ever light you needed that stand back as far away as you could, then zoom in. You wouldn't be in the reflection except maybe ant sized.

Mr Fett
Phalanx Leader
Posts: 115
Joined: Tue Feb 19, 2008 1:48 am
Location: Michigan

Post by Mr Fett » Wed Sep 09, 2009 9:31 pm

Nice! Someday I'll save up enough $ to get my suit chromed.

User avatar
nashslash
Flight Leader
Posts: 340
Joined: Wed Apr 30, 2008 8:09 pm
Location: Milton Keynes UK

Post by nashslash » Wed Sep 09, 2009 10:31 pm

GoldCylon wrote: Also I take it the photos are showing defects that are not present.
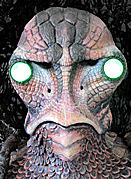
Yes, i photographed everything. what you see is what I got..

All the pieces have turned out 99% great as regarding the chroming. The white spots on the gauntlet is dust. I promise to clean it for the next photo shoot. The support on the backpack I bonded in wasn't strong enough and when Paul lacquered it the mount failed so I had to collect it and rebond a support onto it so that it can go into the chamber for chroming.

The worse piece regarding the chroming is the fibreglass lid. This is because the lacquer is absorbed into the fibreglass at a different rate of say the filler or primmer. This is something Paul had seen before and gave the Lid 3 coats of primer and chomed it twice, and as he said it really is as good as its ever going to get.

Here's the fibreglass lid again, just near the Mohawk there is a slight orange peel effect, however its perfectly smooth to the touch.... maybe I'm just being fussy...compared to my last Cylon costume there is no comparison to the finish here...

Image
www.battlefield-online.net

User avatar
nashslash
Flight Leader
Posts: 340
Joined: Wed Apr 30, 2008 8:09 pm
Location: Milton Keynes UK

Post by nashslash » Thu Sep 10, 2009 9:10 am

Update

Battery belt, well I don't own or am I ever likely to own an original cylon C&M Power belt if and when they come available there generally over the $300 mark...

So I decided to have a go and make my own and hopefully when complete it should look similar.

Using my trusty foam cutting tool (these are available on Ebay for about $20 ish) I cut some foam to form the belt boxes shapes.
Gradually trimming to the required shape, I have got a black tool belt .this is covered in another post regarding Belts. I intend to cover the foam using sticky back PVC giving them the leather ish look, then attach them to the belt hopefully it should look OK when it all done, and only a cylon commander would know the difference.

Image

Image

Image

Image

Image

Image
www.battlefield-online.net

User avatar
GoldCylon
Founder
Posts: 6948
Joined: Fri Dec 02, 2005 3:02 pm
Location: Sacramento
Contact:

Post by GoldCylon » Thu Sep 10, 2009 7:51 pm

nashslash wrote:
GoldCylon wrote: Also I take it the photos are showing defects that are not present.
The worse piece regarding the chroming is the fibreglass lid. This is because the lacquer is absorbed into the fibreglass at a different rate of say the filler or primmer. This is something Paul had seen before and gave the Lid 3 coats of primer and chomed it twice, and as he said it really is as good as its ever going to get.

Here's the fibreglass lid again, just near the Mohawk there is a slight orange peel effect, however its perfectly smooth to the touch.... maybe I'm just being fussy...compared to my last Cylon costume there is no comparison to the finish here...

Image
The orange peel look or aka fish eye finish isn't anything you can feel with your hands. It is more of the finish composite more than anything else. Spraying a few layers of a primer helps a little, but not enough to make it picture perfect. At a distance (2-3 feet) no one will ever notice, or in the over all big picture of a complete Cylon it won't be seen either.

Also a great job on the belt box holder replacement idea.

User avatar
nashslash
Flight Leader
Posts: 340
Joined: Wed Apr 30, 2008 8:09 pm
Location: Milton Keynes UK

Post by nashslash » Sat Sep 12, 2009 11:04 am

www.battlefield-online.net

User avatar
Red Eye
Cylon Empire VIP & BYC.net Gallery Admin
Posts: 4837
Joined: Sat May 20, 2006 10:11 am
Location: Germany

Post by Red Eye » Sat Sep 12, 2009 11:22 am

[quote="nashslash"]

User avatar
nashslash
Flight Leader
Posts: 340
Joined: Wed Apr 30, 2008 8:09 pm
Location: Milton Keynes UK

Post by nashslash » Sun Sep 13, 2009 7:57 am

Update.

Well I just finished my belt and attached the boxes to my tool belt. See my previous post regarding construction of the foam boxes to secure and hold the chrome boxes.


What do you think guys?

Image

Image

Image
www.battlefield-online.net

User avatar
Cylon-Knight
Site Administrator
Posts: 6432
Joined: Wed Jul 23, 2008 9:32 pm
Location: Kansas City
Contact:

Post by Cylon-Knight » Sun Sep 13, 2009 11:09 am

Awesome work! Love the belt, more great work on your build!!
"All Baseships are now in range to attack the Colonies."
Image

User avatar
GoldCylon
Founder
Posts: 6948
Joined: Fri Dec 02, 2005 3:02 pm
Location: Sacramento
Contact:

Post by GoldCylon » Sun Sep 13, 2009 11:49 am

I like it, a great alternative to the belt problem.

User avatar
Red Eye
Cylon Empire VIP & BYC.net Gallery Admin
Posts: 4837
Joined: Sat May 20, 2006 10:11 am
Location: Germany

Post by Red Eye » Sun Sep 13, 2009 12:14 pm

Yes, indeed.

You've solved the problem perfectly!

Nice work again.

User avatar
nashslash
Flight Leader
Posts: 340
Joined: Wed Apr 30, 2008 8:09 pm
Location: Milton Keynes UK

Post by nashslash » Sun Sep 13, 2009 1:51 pm

Update

Making my cylon EYE...

http://www.youtube.com/watch?v=2ZZdgBnxx64

Thanks CORA for the diffusion idea...
www.battlefield-online.net

Mr Fett
Phalanx Leader
Posts: 115
Joined: Tue Feb 19, 2008 1:48 am
Location: Michigan

Post by Mr Fett » Sun Sep 13, 2009 3:17 pm

Great eye light !!! :D

Post Reply

Return to “Centurion Builders' Forum”

Who is online

Users browsing this forum: No registered users and 1 guest