Complete Noob petrified of wrecking helmet Kit.....
-
Oxnard Montalvo
- Centurion
- Posts: 27
- Joined: Tue May 25, 2010 9:58 am
Complete Noob petrified of wrecking helmet Kit.....
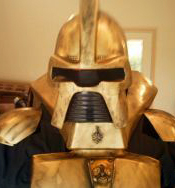
This morning I was the (very Happy) recipient of a Centurian helmet Kit (A surprise from my lovely wife!) - Now, I've built resin replicas before, I've done a lot of scratchbuliding, but this is my first big project... a vacformed, untrimmed lid with resin pieces. The main body of the helmet is in two parts, the mouth grille is seperate, and the interior of the 'eye' is cast in a solid black resin. Obviously I know how the helmet should turn out, but I have no idea how many of the individual parts relate to each other, for example there is also a 'squared U' shaped resin peice that is obviously from around the mouth, but I have No idea where it goes.... The only instructions included are for different paint styles.... can anyone point me in the direction of a possible "Centurian helmet for dummies"? -
-
Red Eye

- Cylon Empire VIP & BYC.net Gallery Admin
- Posts: 4837
- Joined: Sat May 20, 2006 10:11 am
- Location: Germany
Re: Complete Noob petrified of wrecking helmet Kit.....
"There can be no survivors. So long as one human remains alive the Alliance is threatened."

-
groupleaderzeta
- Squadron Leader
- Posts: 658
- Joined: Thu Nov 18, 2010 8:08 am
- Location: Paraguay
- Contact:
Re: Complete Noob petrified of wrecking helmet Kit.....
He has a CORA helm.
If you look at the edge (where the surplus plastic is) you should see a faint recessed line, this is the finish cutting line.
1. Find this line and use a Pencil to better high light that cutting line.
2. Use a razar knife and score a line, (don't need to be perfect) aproxamatly 1/2 inch (12mm) away from the line ON THE SURPLUS SIDE, this will remove most of the surplus plastic.
To score a line, use medium pressure, and run a line with the razor knife, you will do this several times in the same groove. I often do 3-5 passes. Then flex the plastic, it should snap apart, if it don't, score some more.
This should get you started, then we can work on the next steps.

GZ
If you look at the edge (where the surplus plastic is) you should see a faint recessed line, this is the finish cutting line.
1. Find this line and use a Pencil to better high light that cutting line.
2. Use a razar knife and score a line, (don't need to be perfect) aproxamatly 1/2 inch (12mm) away from the line ON THE SURPLUS SIDE, this will remove most of the surplus plastic.
To score a line, use medium pressure, and run a line with the razor knife, you will do this several times in the same groove. I often do 3-5 passes. Then flex the plastic, it should snap apart, if it don't, score some more.
This should get you started, then we can work on the next steps.
GZ
-
Oxnard Montalvo
- Centurion
- Posts: 27
- Joined: Tue May 25, 2010 9:58 am
Re: Complete Noob petrified of wrecking helmet Kit.....
From the description It is a CORA helmet.. it does have the slight recessed line down the centre.... No doubt I'll be back for more tips as and when I get stuck! Thanks for that Guide Cylon knight... it really helps me see where everything fits in...
One quick question... when joining the two halves is it best to glue 'tabs' along the inside on one side of the helm to help hold the two halves together? and is two part epoxy ok to use with styrene?
One quick question... when joining the two halves is it best to glue 'tabs' along the inside on one side of the helm to help hold the two halves together? and is two part epoxy ok to use with styrene?
-
GoldCylon

- Founder
- Posts: 6948
- Joined: Fri Dec 02, 2005 3:02 pm
- Location: Sacramento
- Contact:
Re: Complete Noob petrified of wrecking helmet Kit.....
Just for insight the CORA helmet doubled as the security helmet in Sage of a Star World and is a hockey helmet by our famed hockey glove maker Cooper.
-
groupleaderzeta
- Squadron Leader
- Posts: 658
- Joined: Thu Nov 18, 2010 8:08 am
- Location: Paraguay
- Contact:
Re: Complete Noob petrified of wrecking helmet Kit.....
Tabs do wonders, I would say yes use them. I am not sure on the epoxy, as I used testers model glue that is made for styrene, I would get a piece of scrap plastic and put a dab on it and test it, some epoxy will melt the plastic into gooo.Oxnard Montalvo wrote:From the description It is a CORA helmet.. it does have the slight recessed line down the centre.... No doubt I'll be back for more tips as and when I get stuck! Thanks for that Guide Cylon knight... it really helps me see where everything fits in...
One quick question... when joining the two halves is it best to glue 'tabs' along the inside on one side of the helm to help hold the two halves together? and is two part epoxy ok to use with styrene?
GZ
-
gremlin

- Flight Leader
- Posts: 393
- Joined: Sun Nov 28, 2010 1:46 pm
Re: Complete Noob petrified of wrecking helmet Kit.....
i am keeping an eye on this thread for when i start my cora armer 
-
Oxnard Montalvo
- Centurion
- Posts: 27
- Joined: Tue May 25, 2010 9:58 am
Re: Complete Noob petrified of wrecking helmet Kit.....
The more the merrier! - we can form a 'new builders support group!' - This is one of the nicest, most supportive Forums I've ever been on.... most of the other TV/Prop discussion ones tend to descend into one upmanship and bitching and I've never seen any of that here!gremlin wrote:i am keeping an eye on this thread for when i start my cora armer
Back to the Helm..... I'm just building up the courage to start cutting. I assume once I've cut it (leaving a little extra on the cut line) d.... I then sand down to the recessed Cut line?
(I'll cross the glue bridge when I come to it!)
-
Red Eye
- Cylon Empire VIP & BYC.net Gallery Admin
- Posts: 4837
- Joined: Sat May 20, 2006 10:11 am
- Location: Germany
Re: Complete Noob petrified of wrecking helmet Kit.....
Good luck with the cutting!
"There can be no survivors. So long as one human remains alive the Alliance is threatened."
-
groupleaderzeta
- Squadron Leader
- Posts: 658
- Joined: Thu Nov 18, 2010 8:08 am
- Location: Paraguay
- Contact:
Re: Complete Noob petrified of wrecking helmet Kit.....
Yes. Hint.. take it slow, if you get in a hurry you may slip and gouge the plastic or worst (ouchie, no blood please). Perhaps it would be a good idea to practice on a scrap piece of plastic to become familer with how the razor knife acts on the plastic and it should help you get more comfortable in cutting.Oxnard Montalvo wrote:The more the merrier! - we can form a 'new builders support group!' - This is one of the nicest, most supportive Forums I've ever been on.... most of the other TV/Prop discussion ones tend to descend into one upmanship and bitching and I've never seen any of that here!gremlin wrote:i am keeping an eye on this thread for when i start my cora armer
Back to the Helm..... I'm just building up the courage to start cutting. I assume once I've cut it (leaving a little extra on the cut line) d.... I then sand down to the recessed Cut line?
(I'll cross the glue bridge when I come to it!)
GZ
-
Oxnard Montalvo
- Centurion
- Posts: 27
- Joined: Tue May 25, 2010 9:58 am
Re: Complete Noob petrified of wrecking helmet Kit.....
This has ground to a halt until I can get a better knife. and I need sandpaper.... Still fretting over the glue... Haven't tried epoxy yet. Is ordinary modellers glue for styrene strong enough?
-
groupleaderzeta
- Squadron Leader
- Posts: 658
- Joined: Thu Nov 18, 2010 8:08 am
- Location: Paraguay
- Contact:
Re: Complete Noob petrified of wrecking helmet Kit.....
This is the type knife most use, it allows great control, it come in 2 sizes. I suggest trying both on a scap piece to see how much control and comfort you have.Oxnard Montalvo wrote:This has ground to a halt until I can get a better knife. and I need sandpaper.... Still fretting over the glue... Haven't tried epoxy yet. Is ordinary modellers glue for styrene strong enough?
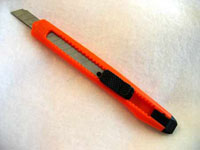
Yes, the modelers glue is strong, use plenty, too little and it will pop apart. Start by putting glue on BOTH pieces, (where you will put the tab), press and hold the pieces with small spring clamps, and allow it to set up over night. I suggest just using tabs in the mohawk area to start with. there is alot of trimming to come BEFORE you glue the halves together for the visor and grill.
clamps I use often.

Anyone else want to chime in here?? Like maybe CORA.
GZ
-
Oxnard Montalvo
- Centurion
- Posts: 27
- Joined: Tue May 25, 2010 9:58 am
Re: Complete Noob petrified of wrecking helmet Kit.....
Ahh I have a few of those knives... Thats really good to know.... as for the 'later' trimming, I guess I assumed I'd remove the Eye and grill pieces before gluing the two halves together.... You see, thats why I asked for advice! I'm too likely to screw this up!groupleaderzeta wrote:This is the type knife most use, it allows great control, it come in 2 sizes. I suggest trying both on a scap piece to see how much control and comfort you have.Oxnard Montalvo wrote:This has ground to a halt until I can get a better knife. and I need sandpaper.... Still fretting over the glue... Haven't tried epoxy yet. Is ordinary modellers glue for styrene strong enough?
Yes, the modelers glue is strong, use plenty, too little and it will pop apart. Start by putting glue on BOTH pieces, (where you will put the tab), press and hold the pieces with small spring clamps, and allow it to set up over night. I suggest just using tabs in the mohawk area to start with. there is alot of trimming to come BEFORE you glue the halves together for the visor and grill.
clamps I use often.
Anyone else want to chime in here?? Like maybe CORA.
GZ
-
savageone
- Citizen
- Posts: 16
- Joined: Wed Sep 19, 2012 4:38 pm
Re: Complete Noob petrified of wrecking helmet Kit.....
How's it coming with the helmet?
-
groupleaderzeta
- Squadron Leader
- Posts: 658
- Joined: Thu Nov 18, 2010 8:08 am
- Location: Paraguay
- Contact:
Re: Complete Noob petrified of wrecking helmet Kit.....
Be sure to read the full post BEFORE doing any work!Oxnard Montalvo wrote:
Ahh I have a few of those knives... Thats really good to know.... as for the 'later' trimming, I guess I assumed I'd remove the Eye and grill pieces before gluing the two halves together.... You see, thats why I asked for advice! I'm too likely to screw this up!
What I found the hard way, with a CORA helm is leave the eye slot plastic intact. If you have not done so, I suggest release some of the excess plastic in the mouth grill area,
leave about 1/4-1/2 inch from the inside edge. Here shows how the grill area will be final trimmed.
Trim one half of the helm to the line. Make sure the black eye visor is clean, and place the helm half in it. Use good masking tape to hold them together. Trim the other half to the line. then place it in the visor, tape in place. Then carefully look at the seam of the front of the mohawk down to the inside top of the visor. Next find what you think would be the center line (try to take off the same amount off EACH half mark the top half with pencil, try to get it close with the knife then sand it to finish. Replace the half and use a sharp pencil trace the cut edge on the other half. Now the center line is done for the upper area.
Now keeping the visor taped in place. Use the black "U" thing similar to the above placing it inside where the mouth grill will be. Tape in place, and do the same as above to find the center of the lower area of the visor. Trim out the rest of the grill area, and trim out the visor area being careful to leave a 1/8 inch extra plastic after where it curves into the visor This will act as a reference point when you mount the black visor.
Check out NASHSLASH Cylon Helmet Build thread, you may get a better idea of what you are doing.
viewtopic.php?f=7&t=628
GZ
Who is online
Users browsing this forum: No registered users and 2 guests