Making the LED holder.....

What you will need...
Diffusion material.
Blank heavy weight stencil mylar, found at Hobby Lobby.Made by PLaid, Simply Stencils - Blank, Item # 28589

Red filter plastic.
Found at Hobby Lobby, no manufacture name.

Black foamie material.
Found at Hobby Lobby.

Tools needed...
Xacto knife, White glue, Masking tape, two small disposable paint brushes, CA+ glue, Ruler.


GreatPlanes, Pro CA glue, #GPMR6008
Step 1...
Using the template below, cut the outline only of one piece of the stencil mylar. Cut one of the red filter material, and four pieces of the foamies.


Step 2...
A. Put a layer of white glue on one side of three foamies.
B. Place one foamie with the glue facing up, place the next two foamies on top with the glue facing up, place the last foamie on top.
C. Carfully place the sandwich of foamies to the backside of the eye socket, using masking tape to hold it in place. start at one end and work your way across the socket, making sure the foamies are even and held snug to the socket so they follow the curve. use masking tape every inch. Let dry.

D. Remove the holder from the eye socket. Add more glue to all edges of the holder. Let dry.
E. Lay the template on the inside of the LED holder, tape on the ends to help hold it in place. Carefully cut the slot in the foamies. Make sure you keep the knife vertical. Cut slowly and only through two at a time. After you have cut the slot, the LED holder should look like this.

F. Place the diffusion material over the outside of the holder, next place the red filter material over the diffusion material.Use small pieces of tape to hold the ends only of the diffusion and red material. Then glue with CA adhesive, only drop on top and bottom of the ends to hold the material onto the holder.
The final gluing will be when you attach the holder to the eye socket.
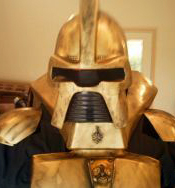
Test fitting to the eye socket.

Please post questions and comments here.
Groupleaderzeta