My modded Krop
-
RedaV

- Patrol Leader
- Posts: 71
- Joined: Sun Apr 01, 2012 11:05 pm
Re: My modded Krop
I also have a Kropserkel Cylon and have already made a few changes. The number one thing bugging me is the backpack where is the best place to source a more screen accurate pack already chromed?
-
Hammer3246
- Patrol Member
- Posts: 50
- Joined: Sun Mar 14, 2010 11:23 pm
Re: My modded Krop
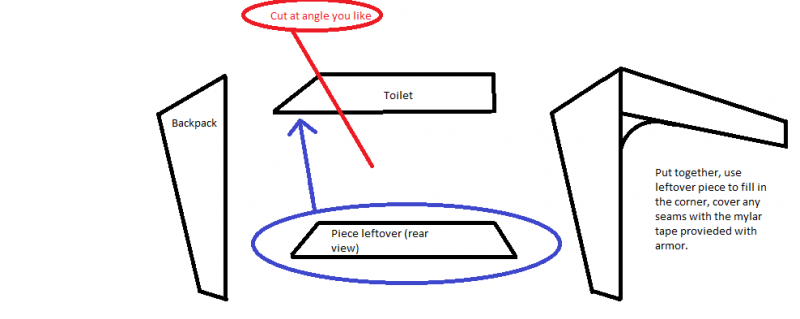
So here is a crappy paint I did to try and show how I change my backpack.
To secure the neck to the backpack after was happy with the angle, I laid a hollow rod of plastruct about 3/8" dia. along the seams where they meet and applied generous amounts of hot glue.
With the piece leftover from the neck I cut out the corners to match the angles, these I glued using tabs of styrene and super glue, I then applied generous amounts of hot glue again just for a little more security.
Mine came with a small piece of mylar, you could probably go to a sign shop for the same thing. This I used to cover up imperfections and seams.
Be sure to use a sharp utility knife and sand the areas to be glue very well as the "varnish" is quite thick and the glue needs something to hold on to.
PS, I hold no responsibility to damaged pieces.
Cheers
Hope this explains it a little better.
To secure the neck to the backpack after was happy with the angle, I laid a hollow rod of plastruct about 3/8" dia. along the seams where they meet and applied generous amounts of hot glue.
With the piece leftover from the neck I cut out the corners to match the angles, these I glued using tabs of styrene and super glue, I then applied generous amounts of hot glue again just for a little more security.
Mine came with a small piece of mylar, you could probably go to a sign shop for the same thing. This I used to cover up imperfections and seams.
Be sure to use a sharp utility knife and sand the areas to be glue very well as the "varnish" is quite thick and the glue needs something to hold on to.
PS, I hold no responsibility to damaged pieces.
Cheers

Hope this explains it a little better.
-
Omega Red
- Phalanx Leader
- Posts: 118
- Joined: Wed Jun 05, 2013 11:19 pm
Re: My modded Krop
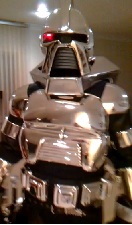
Thank you @Hammer3246! Great job! From your pictures the backpack looks very clean!!! Can you take a picture of the inside? Did you lay the back panel all the way across from one end to the other to cover the gap? Looks great to me !
-
Hammer3246
- Patrol Member
- Posts: 50
- Joined: Sun Mar 14, 2010 11:23 pm
Re: My modded Krop
Sorry, I'm not home and my suit is, so I can't take any photos for a few weeks 
There should be no gap really, I just butted up the edges and covered the seam with a half inch strip of the mylar. The piece that I cut from the neck was used as scrap to cut the sections that round out the hard angle where your back and neck meet.
There should be no gap really, I just butted up the edges and covered the seam with a half inch strip of the mylar. The piece that I cut from the neck was used as scrap to cut the sections that round out the hard angle where your back and neck meet.
-
Hand-Schaub

- First Centurion
- Posts: 756
- Joined: Mon Dec 29, 2008 9:05 am
- Location: Sacramento, CA
Re: My modded Krop
Hammer3246 wrote:Hand-Schaub wrote:If you need vacuformed "L"s I have them available. I don't know how they would fit onto a crop suit though.
But you may want to consider just getting a built and chromed backpack so everything fits as it should.
Could you PM me a price on a chromed backpack?
Cheers
PM officially sent
-
RedaV
- Patrol Leader
- Posts: 71
- Joined: Sun Apr 01, 2012 11:05 pm
Re: My modded Krop
Hey mate,Hammer3246 wrote:So here is a crappy paint I did to try and show how I change my backpack.
To secure the neck to the backpack after was happy with the angle, I laid a hollow rod of plastruct about 3/8" dia. along the seams where they meet and applied generous amounts of hot glue.
With the piece leftover from the neck I cut out the corners to match the angles, these I glued using tabs of styrene and super glue, I then applied generous amounts of hot glue again just for a little more security.
Mine came with a small piece of mylar, you could probably go to a sign shop for the same thing. This I used to cover up imperfections and seams.
Be sure to use a sharp utility knife and sand the areas to be glue very well as the "varnish" is quite thick and the glue needs something to hold on to.
PS, I hold no responsibility to damaged pieces.
Cheers
[img]http://i57.photobucket.com/albums/g212/Hammer3246/backpack.png[/img]
Hope this explains it a little better.
I'd really like to know how you did it! Even if you have detailed pics as I'm really worried about cutting it unless I know exactly where to cut as its to high a risk to do on guess work! Can you help me out a bit more man would be awesome.
Cheers
Redav
-
Hammer3246
- Patrol Member
- Posts: 50
- Joined: Sun Mar 14, 2010 11:23 pm
Re: My modded Krop
I would feel pretty shi**y if you ruined your pack because of me. If you're familiar with working with styrene its fairly easy provided you don't rush yourself. I did mine by using masking tape in different areas to hold the angle I wanted after putting different objects in between where the neck is velcroed to the back before cutting.
Once I was happy with the fit I used a sharpie on the inside to mark where the cut would be on the neck so it would mate to the back. I taped it together again before gluing just to make sure, when I liked the look I glued using hot glue in case I ever wanted to change it later on. When I filled in the angles I used the scrap chrome from the neck and styrene tabs with super glue since the pieces were smaller and bore a little more weight. Other than that, I didn't photo my progress unfortunately and even if I posted pictures of the inside now I don't think it would be of much use.
Cheers
Ron
-
GoldCylon

- Founder
- Posts: 6945
- Joined: Fri Dec 02, 2005 3:02 pm
- Location: Sacramento
- Contact:
Re: My modded Krop
Great little drawing you have done with the details on how to make the adjustment.
-
Hammer3246
- Patrol Member
- Posts: 50
- Joined: Sun Mar 14, 2010 11:23 pm
Re: My modded Krop
Lol. Thanks.
-
RedaV
- Patrol Leader
- Posts: 71
- Joined: Sun Apr 01, 2012 11:05 pm
My modded Krop
So once you cut the angle you buffed the two edges together? Instead of having the rear part overlapping the toilet seat? Can you please post some final finish pics of yours on the outside and also in side how you joined the edges together please
-
Hammer3246
- Patrol Member
- Posts: 50
- Joined: Sun Mar 14, 2010 11:23 pm
Re: My modded Krop
Yep, I just butted them together, no overlap, laid the tube of plastruct in the seam and hot glued.
Once it's done it's no longer a two piece unit.
Once it's done it's no longer a two piece unit.
-
Omega Red
- Phalanx Leader
- Posts: 118
- Joined: Wed Jun 05, 2013 11:19 pm
Re: My modded Krop
How long did it take u to cut through the plastic? And the way you curved that inside corner looks so seamless. Got a suggestion on the tools/ utility knife etc...? Blade size ...
-
RedaV
- Patrol Leader
- Posts: 71
- Joined: Sun Apr 01, 2012 11:05 pm
Re: My modded Krop
Was it hard to get the adhesive Velcro off? Didn't lift any chroming?
-
Hammer3246
- Patrol Member
- Posts: 50
- Joined: Sun Mar 14, 2010 11:23 pm
Re: My modded Krop
About 2 minutes, I bought some more of the door trim thats used around the helmet opening and applied it all the way around the neck and back, that's why it looks that way. I just used a straight edge and an exato knife to do the cutting, it took several passes, usually you can just score and snap styrene but this stuff was pretty soft.
-
Hammer3246
- Patrol Member
- Posts: 50
- Joined: Sun Mar 14, 2010 11:23 pm
Re: My modded Krop
It was stuck on there pretty good, once I had a corner started I grabbed it with plyers and pulled, goo gone took off any leftover adhesive, the chrome seemed unaffected.RedaV wrote:Was it hard to get the adhesive Velcro off? Didn't lift any chroming?
Who is online
Users browsing this forum: No registered users and 1 guest