'What is - and how to vac form? The info is not specific to Classic Cylon Centurions, but SURE can be helpful for them and many, many others projects. Here you'll find various threads with great info from our members for the hobby of costuming.
Power Supplies, Controler Boards, Stepper Motors, Software
Most all of the sites I have listed here have links and sources for the all the components necessary for each build
They will recommend the correct Stepper motors, Controler Board and the software that works best with the machine you are building.
Software
Software is a vast subject and many different CAD programs and controler interface programs are used in these machines so I'm really only going to say that these programs are your preference for design and or whatever machine build you choose and the recommendation from the plan creators of the correct match of software for that machine.
USB Controler
Controllers are the interface between your computer and your machine.
The software talks to the controler and the controler runs the stepper motors.
[attachment=1]boardMk2_400.png[/attachment]
Stepper Motor
[attachment=9]Stepper2,5.jpg[/attachment]
Power Supplies
Power supplies vary from door bell transformers and a dimmer switch to Variable speed Model train transformer, or Regulated/Switching power supplies and are used to heat the Hot Wire as well as can be used to power the motors and sometimes other circuitry.
Regulated Supply
[attachment=8]Regulated Power Supply2.jpg[/attachment]
Variac Transformer
[attachment=0]Variac transformer.png[/attachment]
Model Train Transformer
[attachment=7]Train Supply.jpg[/attachment]
Any of these power supplies will power your hot wire whether its your hand held carvers, Scroll Tables or your CNC Hot Cutter machine.
Certian designs require other power supplies to provide power for the motors and controller circuitry.
So that is about all I can think of for making Wood and Blue Foam plugs. Like I said you can make parts alot of different ways and these are alot of ways to make them.
I hope you enjoyed this section on making wood and foam plugs and can use something from it.
Another process for making Plugs and parts is Resin Casting and we will talk about that next.
Next Up: Useing Resin Casting for making Plugs
Attachments
Variac transformer.png (174.72 KiB) Viewed 8750 times
Variac transformer.png (174.72 KiB) Viewed 8750 times
boardMk2_400.png (282.1 KiB) Viewed 8750 times
boardMk2_400.png (282.1 KiB) Viewed 8750 times
wecutfoam_foamlinx_cnclinx_eps_xps_CNC_Router_foam_machining_dragon_s.jpg (13.18 KiB) Viewed 8815 times
wecutfoam_foamlinx_cnclinx_eps_xps_CNC_Router_foam_machining_dragon_s.jpg (13.18 KiB) Viewed 8815 times
xps_foam_machining_foamlinx.jpg (13.55 KiB) Viewed 8815 times
xps_foam_machining_foamlinx.jpg (13.55 KiB) Viewed 8815 times
wecutfoam_EPS_foam_machining_using_cnc_router_concept_truck_5_200.jpg (15.71 KiB) Viewed 8815 times
wecutfoam_EPS_foam_machining_using_cnc_router_concept_truck_5_200.jpg (15.71 KiB) Viewed 8815 times
foamlinx_eps_prop_train_2.jpg (9.09 KiB) Viewed 8815 times
foamlinx_eps_prop_train_2.jpg (9.09 KiB) Viewed 8815 times
Train Supply.jpg (8.33 KiB) Viewed 8815 times
Train Supply.jpg (8.33 KiB) Viewed 8815 times
Regulated Power Supply2.jpg (45.48 KiB) Viewed 8815 times
Regulated Power Supply2.jpg (45.48 KiB) Viewed 8815 times
Last edited by Big Al on Sat Aug 13, 2011 12:23 am, edited 4 times in total.
I was introduced to resin casting in April of 2002 at the Toledo R/C Show. I was looking at the booths getting Ideas for building and I ran into the Alumilite guy's. Then I watched him make a resin cast part in less than 10 minutes from start to finish and the lightbulb went on!
The first thing that ran through my mind is how I could use that resin casting method for replacing some chess pieces from and old carved set my dad gave me. I still had the pieces but some of them had broken and chipped areas on them and this would be a great way to fix them.
Then it hit me that I could make parts for my planes with this system as well as make plugs for my Vacuum Form machine.
Gold Cylon and Skullbeast are master artists and have examples of Resin Casting Cylon Insignia pieces they have made on another thread here at BYC and they are beautiful!
[attachment=2]BSGINSIG.jpg[/attachment]
[attachment=1]chestinsignia02.jpg[/attachment]
[attachment=0]collarinsignia02.jpg[/attachment]
This is just some of the parts that can be made with Resin Casting and these two guy's have done an outstanding job.
I hope they will comment on this subject here.
My point is that you can either make parts to use directly on your project or you can make Plugs.
The Process
I'm not going to spend alot of time on the process because there are many sites that cover this subject in great detail and I will post the links if you want to learn more. This is a great way to make plugs and parts and needed to be included in this discussion. I have listed below the equipment you will need to make Resin Castings.
First you need to make a mold box and this can be made from wood, Plastic, ar anything that can be sealed so when you pour your silicone in the box, it will hold it and not leak. some guy's use legos, Next a clay base is used most of the time to hold your original in place while you pour the silicone around your part. There are several techniques that you will use depending on the configuration of you part such as a one piece mold or a two piece mold, mold key's, Resin pouring tubes etc. When you mix your silicone you can place it in a vacuum chamber to degass or remove the bubbles from the silicone, Vibration tables are used as well to tease any bubbles to the top of your liquid. Once the silicone has been degassed, you pour it in your mold box. Once the silicone has vulcinized (Cured) you have a mold. Once you have a mold you can cast your part. One way to cast is to simply mix the resin and pour it in the mold, another way is to mix it, pour it, and then stick the entire mold in a pressure chamber, (Pressure Casting) to force out any bubbles in your resin.
This is a simplistic explination of course and there is much more to the process than I have covered here.
These links are packed with detailed information, How to's Technique, Tutorials, Step by Step, and loads of pictures. Also supliers where you can get everything you need for casting.
Resin Casting Links
Let's start with the Alumilite Guys. This is where I started and their site is packed with applications, How to videos, and a plethora of information and they have everything you need to cast parts. They are also all great guy's and if you have any questions you can contact them by phone or e mail and they are always glad to help.
This is Hirst Arts Casting Page
and is probably the most intence detailed step by step site on casting that I have seen.
Lots of info, Videos and links.
This is Freeman Manufacturing and supply Video Library packed with downloadable Videos on this subject.
Resin Obsession is a very Girly site and is all about casting jewlery but she also has a great deal of information on casting and the whole process, equipment, resins etc.
These are some great links with How to's, Tutorials, Step by Step instructions, Videos and Pics, as well as supplies.
I have used resin casting to make many parts as well as Plugs so it's somthing you want to know about when modeling.
Equipment
The equipment you will need is
Vacuum Pump Vacuum Chamber Air Compressor Pressure Chamber Vibration Table
All of this equipment is to remove bubbles from your silicone and your resin.
Vacuum Pump
Same pump you will use on your Vacuum Former
[attachment=8]2.5 cfm pump.jpg[/attachment]
Vacuum Chamber
[attachment=9]Vacuum%20Chamber.jpg[/attachment]
These Chambers are used to degas the silicone that is used to make molds. You can buy this one above for $169 to $240 depending where you get it, or you can make it from a very large PVC Coupler 8 to 12 inches in diameter, 2 thick pieces of plexiglass or acrilic large enough to cover the pvc diameter with an inch of hangover space to the edge. (Is the way I like it), 2 red rubber gaskets (Heater Pipe Gaskets) ,Vacuum Gauge and fittings and save a ton of money.
This one is made of clear plexiglass so you can see inside the chamber
No need for overkill a small to med compressor is fine. The air compressor is used to pressurize a tank for Pressure Forming your resin pressing the bubbles out of the resin.
Vibration tables are used to bring the bubbles to the surface in your material (Silicone/Resin) when it's wet.
This method is used when making concrete and is also used when making molds for resin casting. You can buy a commercially made table as many are available however they can get pricy and it's pretty easy to make your own.
Pro Vibration Table
This table is used mostly in dental offices and costs right around $140 and up
The rest is just like always "Just Do It!" trial and error and the only way to master this process just like the rest.
Casting is a great way to make plugs for vacuume Forming and the resin retains great detail.
Next Up: Back to Vacuum Forming (Webbing)
Attachments
Concrete Vibrator.gif (38.24 KiB) Viewed 8809 times
Concrete Vibrator.gif (38.24 KiB) Viewed 8809 times
vib15.jpg (12.19 KiB) Viewed 8809 times
vib15.jpg (12.19 KiB) Viewed 8809 times
Pro Vibration Table.gif (12.96 KiB) Viewed 8810 times
Pro Vibration Table.gif (12.96 KiB) Viewed 8810 times
Last edited by Big Al on Sat Aug 13, 2011 12:26 am, edited 2 times in total.
Back To Vacuum Forming (Webbing and other problematic issues)
Ok I have droned on long enough about making plugs, the processes, and the tools and I'm Just about to wrap this thing up!
Even with all the information I have stated and posted over the last few weeks, Pulling a Vacuum Formed part is where the rubber or "Plastic" Hits the road!
No matter how smart you are or how much equipment you have or how much time you have spent on making the perfect plug, You can still have problems the minute the plastic hits the plug.
The biggest Part Ruining!, ... Dream Wrecking!, ...! Buzz Killing!, ......... Evil Gremlin there is when your Vacuum Forming a Part....... is!.......... WEBBING! ......
Beleive it or not some Webbing is acceptable depending on your part and how it will be cut and the location of the webbing.
This is an example of one of those times when Advanced Skills Blows a "Never Ever Do This Rule" right out of the boat!
When I started there were a list of rules I mentioned and one of the cardinal rules is "NO Undercuts" in your Plug!
Until you need the under cut to get the right part.
This is a benchseat for a model truck. Notice the plug has severe under cuts. The reason is to get the plastic to wrap around the front of the bench plug for scale upholstery. webbing occurs below the cut line of the part.
These are several stormtrooper parts pulled on one plastic sheet and there is webbing but the webbing is not in any critical areas and can be cut out.
[attachment=5]Storm Trooper 3.jpg[/attachment]
There are a few reasons why your plastic will web
Plastic gets to hot and sags to much stretching before the pull then folding in on it self. (You must watch closely) Plug is too big or too small for the sheet you are using. When using multiple plugs on one pull, Plugs are to close together
One solution for this is to build a riser under your plug allowing your plastic to stretch around your part keeping the webbing below the cut line.
Another solution is making sheet reducers for your frames when using small plugs. (Apropriate size plastic for your pull)
A small frame say a 6x12 can be made to span across a 12x12 frame alowing you to use half the plastic and reducing the plastic area for smaller or single parts.
Form followers can be made from Wood or MDF and are just a flat board the same inside diameter size as your sheet plastic when mounted in the frame and then you cut a hole the wood in the shape of your plug slightly larger than the widest part of your Plug (bottom/base). This device will assist the plastic when stretching around your plug froming the plastic in a more uniform way, and helps control the unused portions of plastic on the sheet preventing it from folding in on it self during your pull.
There are a number of other problems that can occur and here is a list I found that is spot on!
Problems with vacuum forming:
Sheet does not pull down over the mold:
Air may be trapped between the mold and the sheet. Check that you have enough evacuation holes The sheet may not be hot enough increase heating time The clamp frame may need replacing The vacuum pump filter may need cleaning The sheet may be cast acrylic which is not best for vacuum forming
Sheet burns or blisters:
The sheet has become too hot The sheet may be hygroscopic and moisture in it causes blisters If sheet is over 5mm it will need more time for the heat to soak all the way through Reduce power and increase heating time Sheet pulls out of clamp frame when raising the platen and mold: The sheet is not positioned correctly The sheet is not hot enough increase the heating time The material may not be vacuum formable The mold may be too large or the edges too close to the perimeter of the forming aperture. Modify the mold design
Webbing occurs on the finished forming:
The sheet is too hot and it has sagged during heating. Reduce heating time The design of the mold may need to be modified Forming will not release from the mold: There may be undercuts on the mold which are holding the forming in place The forming may have shrunk onto the mold starting the blow cycle early The mold material may have bonded with the forming material Put a thin coating of silicone oil on the mold before forming The mold is too hot, turn the machine off and wait for the mold to cool off before attempting another forming The mold surface is too rough, make sure there is an even finish on the mold before vacuum forming.
Forming will not release from the mold:
There may be undercuts on the mold which are holding the forming in place The forming may have shrunk onto the mold start the blow cycle early The mold material may have bonded with the forming material Put a thin coating of silicone oil on the mold before forming The mold is too hot, turn the machine off and wait for the mold to cool off before attempting another forming The mold surface is too rough, make sure there is an even finish on the mold before vacuum forming.
Well That's about all I got on this subject. It's been fun putting this together and I hope it will help. Like I said in the beginning, I'm no expert just have some time on the subject.
When I first started gathering info on Vacuum Forming it was very sparse, there wasn't that much info on the net and the books were all on industrial manufacturing.
Now there is an endless stream of info on the subject of home forming but not all in one place.
I wanted to do this to try and bring it all together in one place or as much as I could and it still isn't everything.
I will continue to add to this thread in the future if I find more information that's relative .
I do have some assorted PDF's and more book recommendations I will post tommorow on the subject and a couple of information updates, Like why you should NEVER USE AUTOMOTIVE FILER ON BLUE FOAM, Well almost never and I will explain tommorow.
That's it for tonight!
Attachments
Heat Gun.jpg (14.46 KiB) Viewed 8795 times
Heat Gun.jpg (14.46 KiB) Viewed 8795 times
Last edited by Big Al on Sat Aug 13, 2011 12:27 am, edited 3 times in total.
Cylon-Knight wrote:WOW!
Great info Big Al... THANK YOU, THANK YOU!!!
No Problem, I hope someone can use the info. And thank you for all of your help with the postings, and the pics, and the PDF's and the codes,....LOL If it weren't for you I would still be trying to figure out how to post a link!
As I really got into it, I started thinking maybe some of the stuff should be a seperate thread and then I realized that ...Yea they could be but when you vacuum forming, all of it is relative. so there it is!
I ran across an artical on the correct way to vacuum forming plastic written by a hobby guy who was livid about another artical on the subject of vacuum forming that had been published in a Hobby periodical July 2011 Model Aviation.
His anger and discontent with the artical stemmed from a couple of traditional recomendation guidlines that he felt were a deliberate conveying of misinformation.
I read his artical and felt I needed to address his points because I felt he had made some good points but was not totaly correct in his assessment.
One point he had made was that useing petrolium jelly as a mold release (Suggested in the Model Aviation Artical) was an absolute NO! NO!.....his asertion was that if you needed Vasaline, your plug had a problem,
Sticky Plugs
Plug Not smooth enough Undercuts Plastic is too hot!
....In addition to that the Vasaline can contaminate your plug, your machine and cause problems with your part when you want to paint it! (Clear part painted from the inside).
This is true to some extent but it is my opinion that sometimes you need a very light coat of something depending on the complexity of your plug.
His suggestion is to use a light coating of talcum powder instead (Good Advice).
Another alternative is to use a mold release such as a silicone based spray but I suppose the results could be the same as Vasaline.
There are no set in stone rules!! you use what you have to when making your part. Just like the "NO UNDERCUTS IN YOUR PLUG" rule.
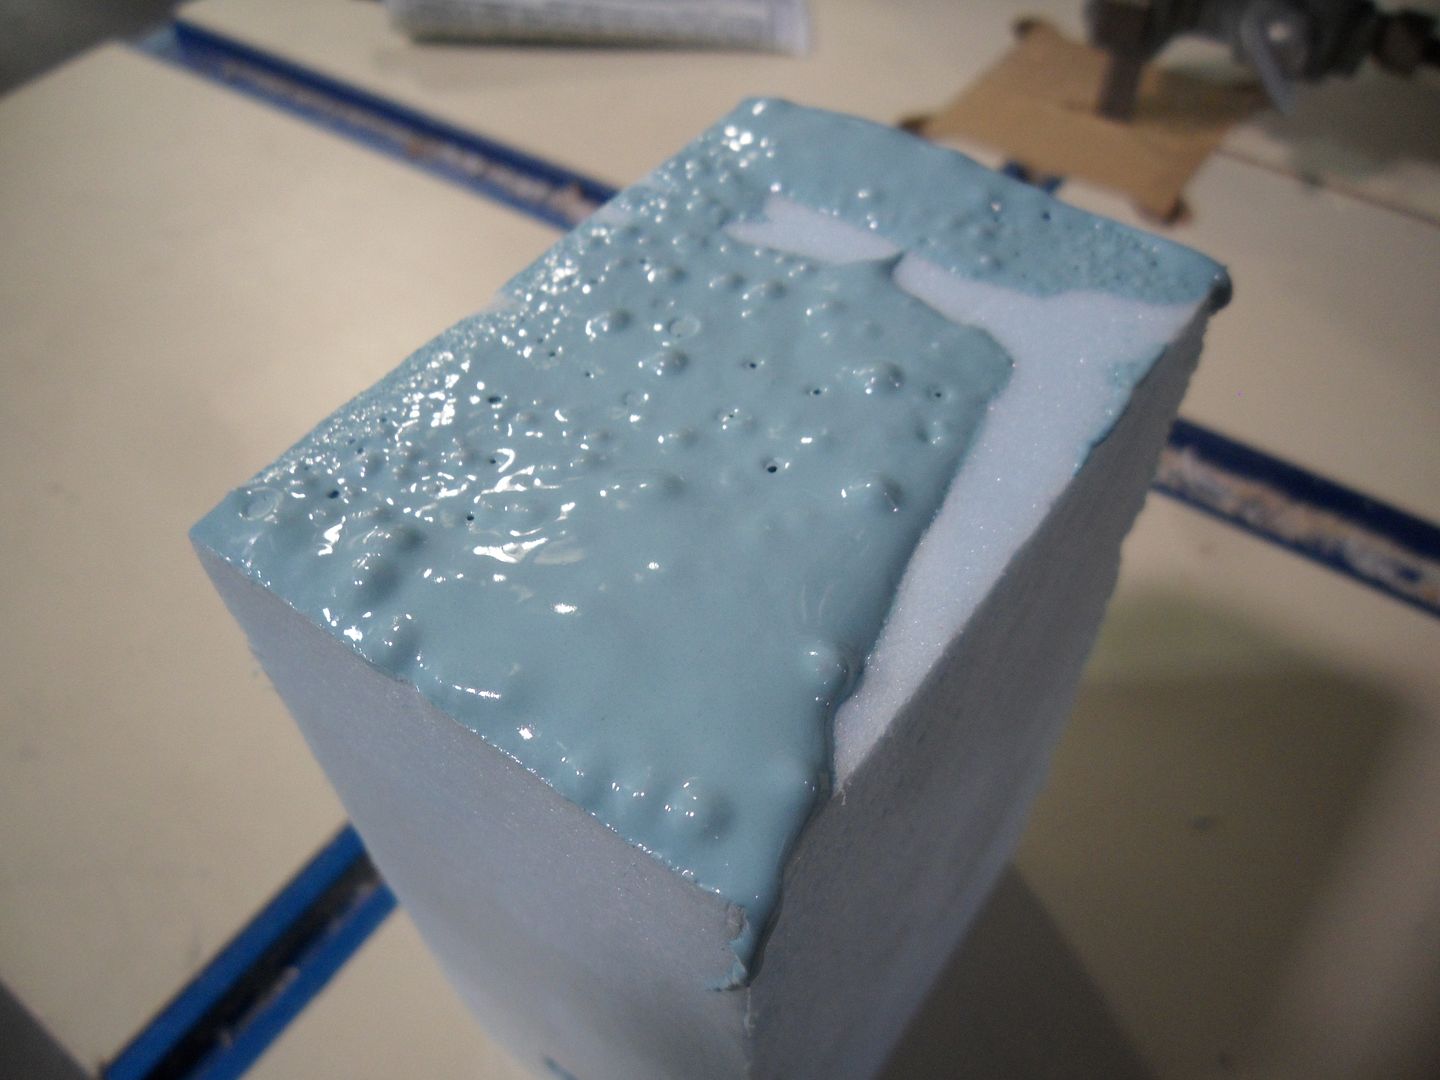
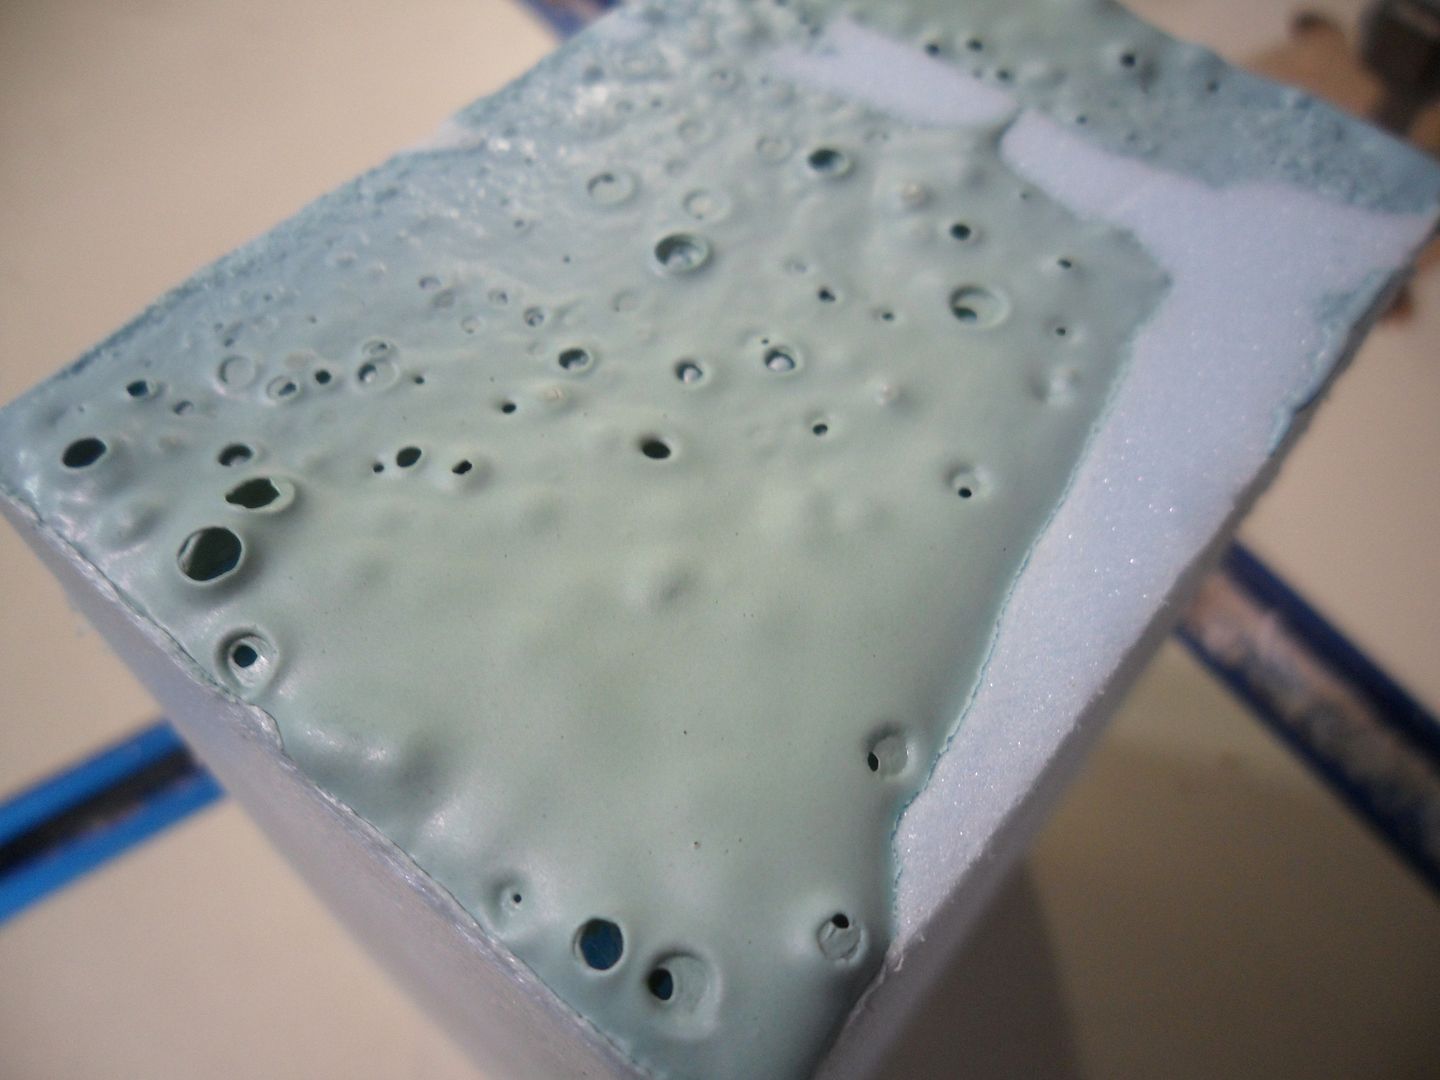
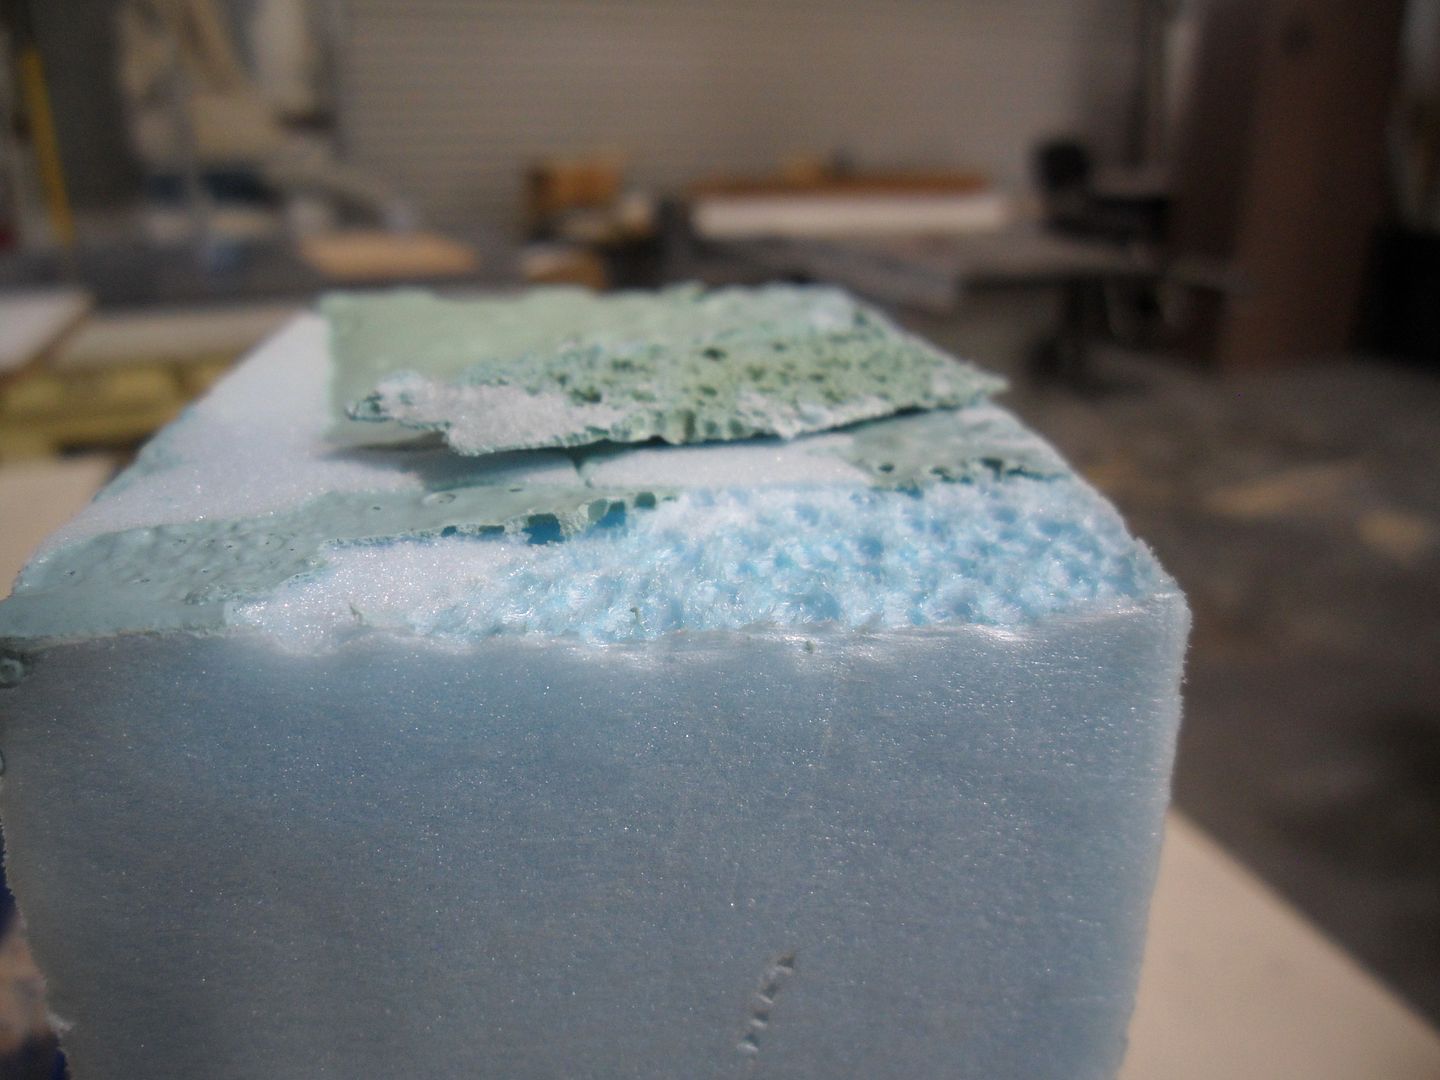
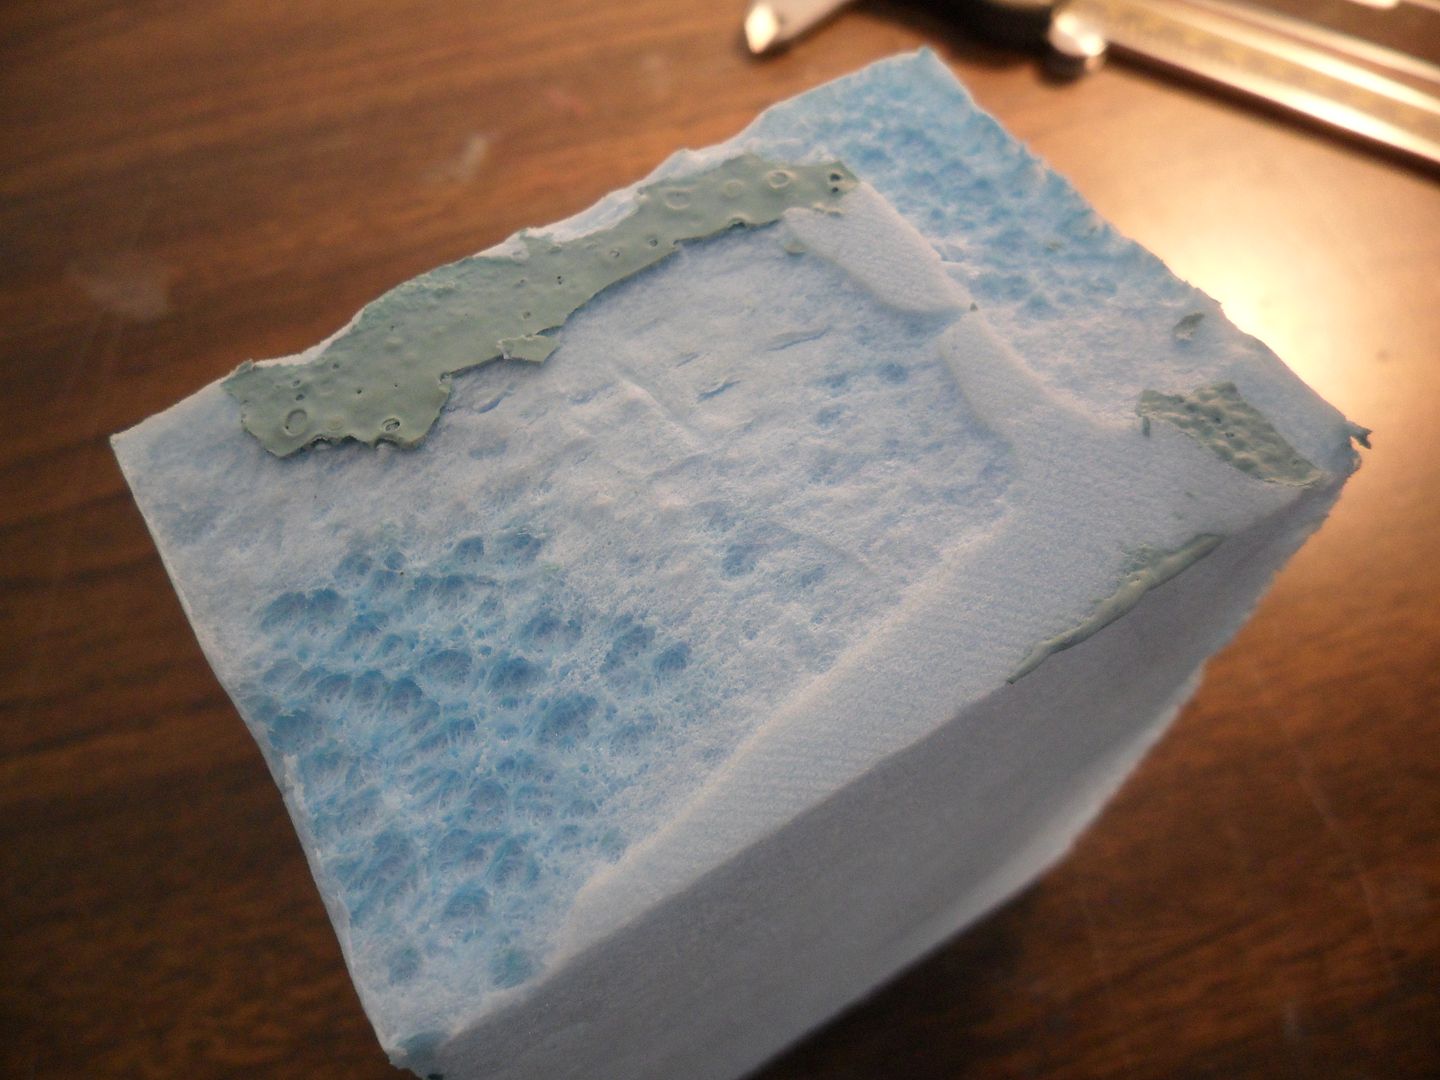
The other point of discontent this fellow had was the use of Automotive filler used directly on blue foam.
Here are some pics of what can happen.
This is an Automotive Filler applied directly to the blue foam and it begins to gas immediatly
Photo 2 is the harden filler
Photo 3 and 4 shows how the filler poped off with no foundation to hold it
Ok I know this looks bad! However I wanted to put my 2 cents in on this issue.
Anything you use on blue or pink foam can melt the foam if it contains any kind of solvent including CA glue!
Thats why in an earlier post I recommended a epoxy resin with microbaloon filler as it contains no solvents!
Another technique is that you CAN use a solvent based filler if you fiberglassed your blue foam first or simply cover the foam with epoxy creating a barrier between the blue foam and the filler! This also gives a foundation for the filler to stick to! but I highly recommend the epoxy and microbaloon filler method.
Another point this fellow made was how you can pull a complexed shaped part without webbing.
I agree 100% and if you notice in this pic he has included a base on his plug.
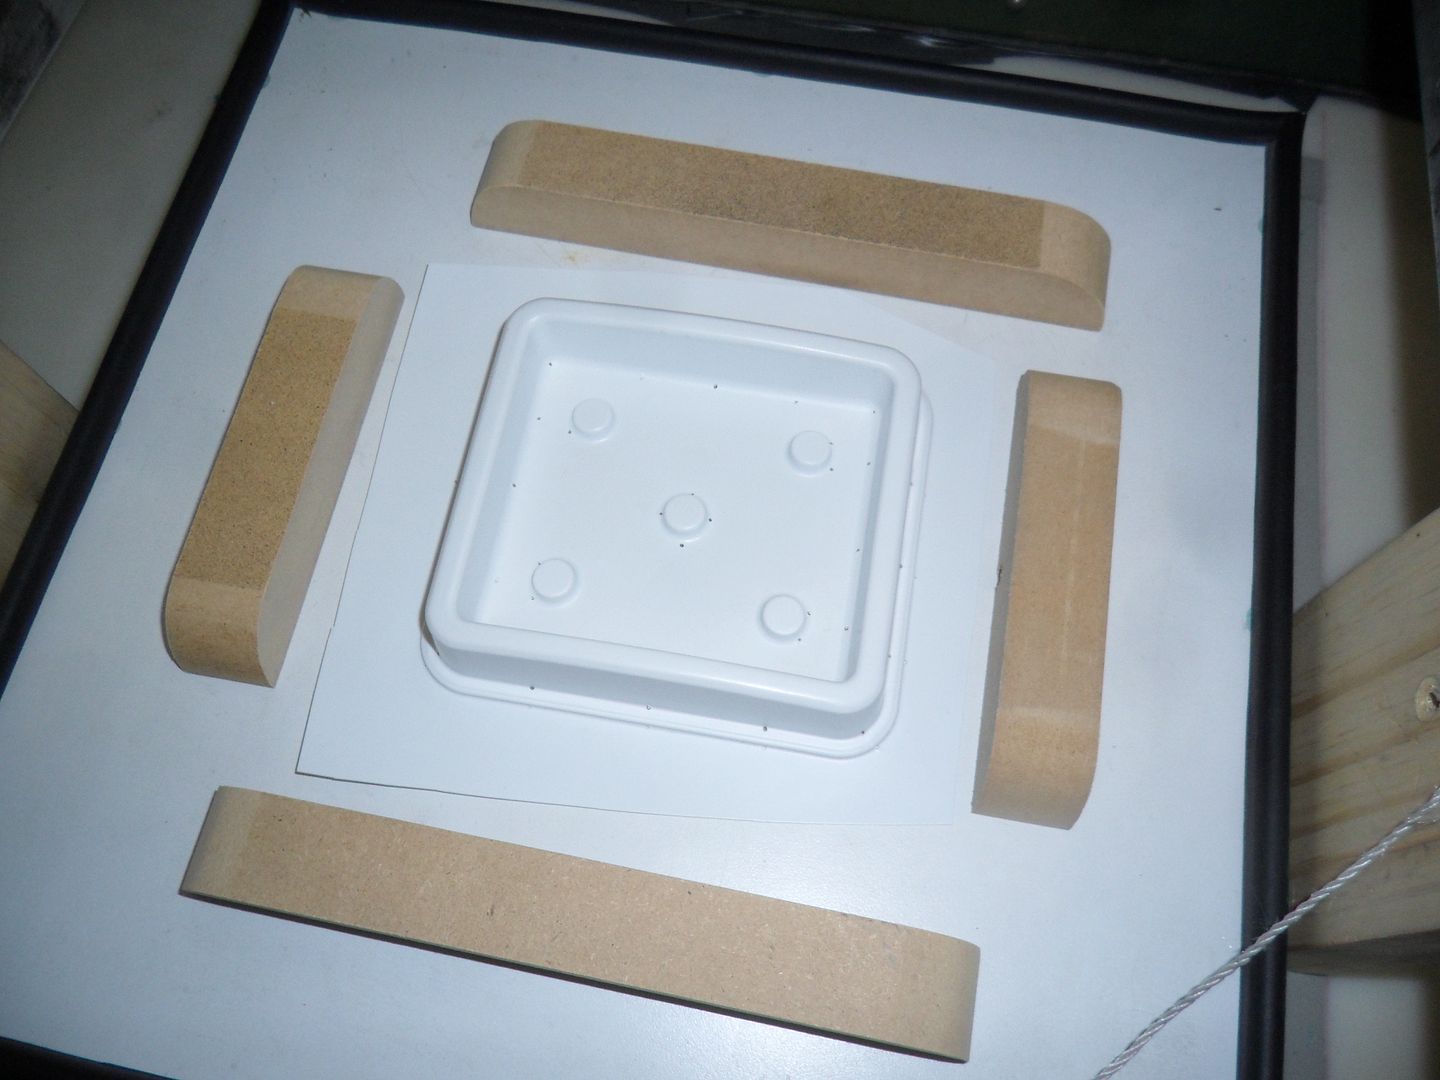
This next pic is an example of a technique used to prevent webbing by adding blocks of wood around the parimeter of your plug prior to the pull allowing the excess plastic to be pulled away from your plug.
As far as the so-called "Rules" go I believe they are basic guidelines so don't limit yourself by building walls of unbreakable Rules!!
In an earlier post I showed you an example of a part made with a plug that had been designed purposely with severe undercuts .
So I did not see the original Model Aviation article but as far as the advice goes, I guess I agree. but just as he was upset with the periodical article, It is my contention that there is no set in stone rules that's all.
And this gives you some more details on Technique.
Here is a link to his artical so you can judge it yourself. Just remember There really are no "RULES" just make it happen!
Here are a few Videos on Vacuum Forming I thought you would like to see
This one is a guy using the "Home Oven Method"
This is a 4X4 machine that appears to be hand built but is a commercial machine with air actuators to plunge the plastic to the platen.
Here is their 2X2 machine
This machine is made by Stelter Creative These are wonderful machines but come with a heavy price tag.
Here is one where the guy is using a heat gun to warm the plastic before the pull (Very Rudimentary but it works!)
Here is another demo of a home Vac except this guy does uses a technique I forgot about. He uses a damp rag to assist the form and cool the plastic as it hardens.
I will post more of these as I find them.
Last edited by Big Al on Sat Aug 13, 2011 12:30 am, edited 1 time in total.
Big Al wrote:Gold Cylon and Skullbeast are master artists and have examples of Resin Casting Cylon Insignia pieces they have made on another thread here at BYC and they are beautiful!
Skullbeast is a master artist, but I haven't made anything at all. the medallions you are speaking of were done up by the boss of a board member that works at a prop house. That isn't my work work, but thanks for the credit anyway...LoL
Well dude, I got all but maybe 12-ish back, sorry. I might be able to track them down too if you can't repost them. But not tonight... it is another "should have been in bed three hours ago" night.
"All Baseships are now in range to attack the Colonies."