does anyone know if there was a cockpit made for this, i was always disapionted the there was no cockpit and would like to have one ofor this. i know there was one made for the bigger ones if i am not mistaken...
Cylon Raider OOB Build
-
gremlin
- Flight Leader
- Posts: 393
- Joined: Sun Nov 28, 2010 1:46 pm
Re: Cylon Raider OOB Build
nice i have both the origanal (monogram) and the rerelease (revell)... nice build 
does anyone know if there was a cockpit made for this, i was always disapionted the there was no cockpit and would like to have one ofor this. i know there was one made for the bigger ones if i am not mistaken... i seen it ... i know i did
does anyone know if there was a cockpit made for this, i was always disapionted the there was no cockpit and would like to have one ofor this. i know there was one made for the bigger ones if i am not mistaken...
-
Cylon-Knight

- Site Administrator
- Posts: 6420
- Joined: Wed Jul 23, 2008 9:32 pm
- Location: Kansas City
- Contact:
Re: Cylon Raider OOB Build
I've seen the one for the sudio scale Raiders too, yes, it's real. BUT, I don't think there is one for the Mono/Revell ones  *much sadness*
"All Baseships are now in range to attack the Colonies."

-
Tinman
- Fallen Centurion - R.I.P.
- Posts: 231
- Joined: Thu Feb 21, 2008 11:41 am
- Location: Arkansas, USA
Re: Cylon Raider OOB Build
I don't recall having ever seen one for the Raider - either a photo of or even mentioned.

TINMAN
-
Cylon-Knight
- Site Administrator
- Posts: 6420
- Joined: Wed Jul 23, 2008 9:32 pm
- Location: Kansas City
- Contact:
Re: Cylon Raider OOB Build
:frak: Man, I just saw one the other week. I'll try to track it down again and save it this time.
"All Baseships are now in range to attack the Colonies."
-
Tinman
- Fallen Centurion - R.I.P.
- Posts: 231
- Joined: Thu Feb 21, 2008 11:41 am
- Location: Arkansas, USA
Re: Cylon Raider OOB Build
FLASH NEWS!!! I just ran across a cockpit for the Cylon Raider on "Evil-Bay": http://cgi.ebay.com/battlestar-galactic ... 20b740a962gremlin wrote:nice i have both the origanal (monogram) and the rerelease (revell)... nice build
does anyone know if there was a cockpit made for this, i was always disapionted the there was no cockpit and would like to have one ofor this. i know there was one made for the bigger ones if i am not mistaken...
Kinda a unusual thing though as the way the model is built you can't see in the cockpit anyway.

TINMAN
-
Cylon-Knight
- Site Administrator
- Posts: 6420
- Joined: Wed Jul 23, 2008 9:32 pm
- Location: Kansas City
- Contact:
Re: Cylon Raider OOB Build
Great find! I have the pictures downloaded, I'll post them to the gallery for the ages.... 
"All Baseships are now in range to attack the Colonies."
-
Cylon-Knight
- Site Administrator
- Posts: 6420
- Joined: Wed Jul 23, 2008 9:32 pm
- Location: Kansas City
- Contact:
Re: Cylon Raider OOB Build
"All Baseships are now in range to attack the Colonies."
-
Tinman
- Fallen Centurion - R.I.P.
- Posts: 231
- Joined: Thu Feb 21, 2008 11:41 am
- Location: Arkansas, USA
Re: Cylon Raider OOB Build
CRESCENT WING STRIPES
As mentioned in the post above - because of the bumps and and uneven surfaces on the upper wings of the Raider we won't be able to use the decals provided with the kit. You simply wouldn't be able to make them bend and twist over all the complex curves without them tearing, deforming or just not coming out in the shape we wanted so we will have to mask the shape off and paint it on the model.
MAKING THE MASKS:
Making the masks for this model is pretty simple as we can use the kits decals to provide the template we need.
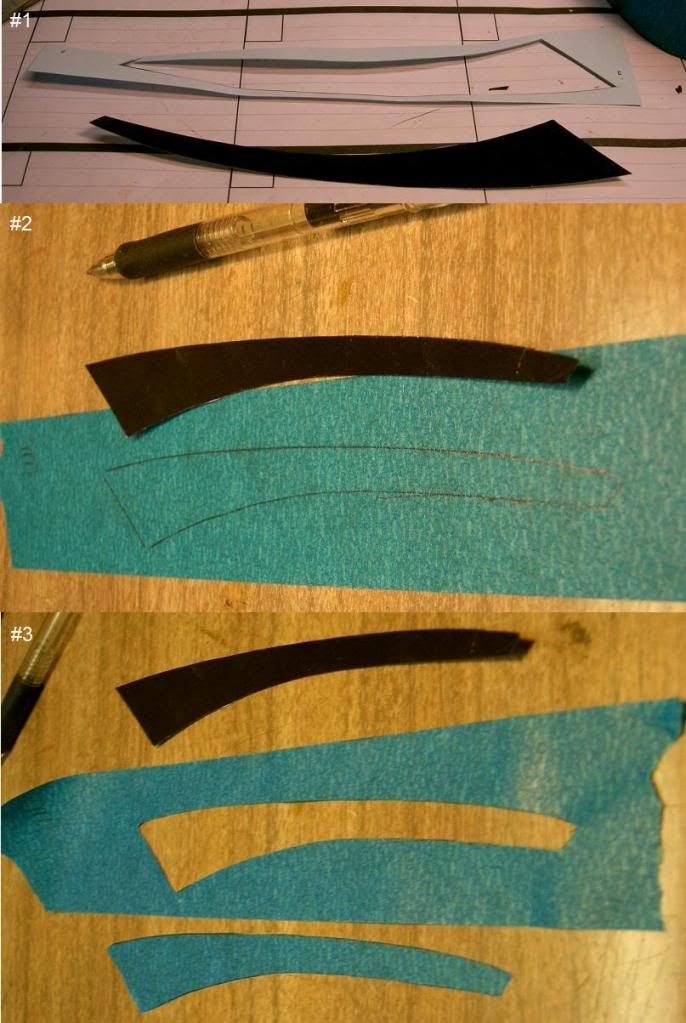
1. As shown in the picture below, with a good pair of scissors, take one of the crescent decals from the decal sheet provided with the kit and carefully cut it out in a smooth line along the outside of the black part. This is so the edge won't have a wavy appearance to it.
2. Taking "Low Tac" painters trim tape (found in any discount or hardware store) put a piece on a hard smooth surface (that you don't mind cutting on) and now taking a fine tip pen - trace the outline of the crescent onto the tape.
NOTE: To keep from ruining both decals or if you make a mistake cutting it out you can use just the one as a "Mirror" for the other side - just flip it over to the backside when you trace the mask for the second wing.
3. Taking an X-Acto knife (another must have for the serious modeler)(sets found in any hobby shop) with a round-edged blade carefully cut around the outline staying exactly on the line you traced. A good trick is to just cut a inch or so at a time then move your wrist to reposition your hand. This keeps you from pulling off the line while trying to pull your hand along. Once you have it cut - carefully pull the tape up from the table to keep from tearing it.
As mentioned in the post above - because of the bumps and and uneven surfaces on the upper wings of the Raider we won't be able to use the decals provided with the kit. You simply wouldn't be able to make them bend and twist over all the complex curves without them tearing, deforming or just not coming out in the shape we wanted so we will have to mask the shape off and paint it on the model.
MAKING THE MASKS:
Making the masks for this model is pretty simple as we can use the kits decals to provide the template we need.
1. As shown in the picture below, with a good pair of scissors, take one of the crescent decals from the decal sheet provided with the kit and carefully cut it out in a smooth line along the outside of the black part. This is so the edge won't have a wavy appearance to it.
2. Taking "Low Tac" painters trim tape (found in any discount or hardware store) put a piece on a hard smooth surface (that you don't mind cutting on) and now taking a fine tip pen - trace the outline of the crescent onto the tape.
NOTE: To keep from ruining both decals or if you make a mistake cutting it out you can use just the one as a "Mirror" for the other side - just flip it over to the backside when you trace the mask for the second wing.
3. Taking an X-Acto knife (another must have for the serious modeler)(sets found in any hobby shop) with a round-edged blade carefully cut around the outline staying exactly on the line you traced. A good trick is to just cut a inch or so at a time then move your wrist to reposition your hand. This keeps you from pulling off the line while trying to pull your hand along. Once you have it cut - carefully pull the tape up from the table to keep from tearing it.
TINMAN
-
Tinman
- Fallen Centurion - R.I.P.
- Posts: 231
- Joined: Thu Feb 21, 2008 11:41 am
- Location: Arkansas, USA
Re: Cylon Raider OOB Build
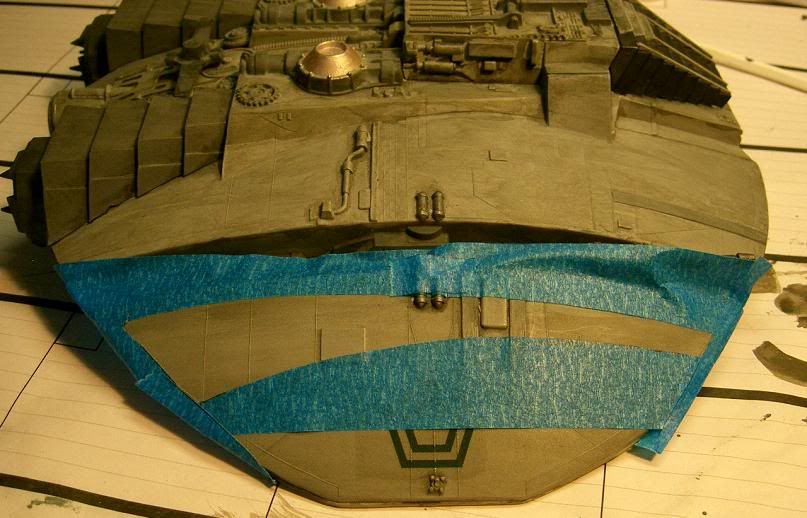
Here is a pic of the mask in place on one wing of the Raider.
The easiest way to do this is to take the decal you cut out and place it where you want the stripe to go on the model and taking a mechanical pencil make yourself some small guide marks of where you want to place your mask to get the shape you want to end up with. Move slowly putting the mask down and check it by holding the decal over it to make sure the curves are right. Once it is where you want it then you can press the tape down firmly.
Now take your X-Acto knife again and go along and press your tape down around each bump so it is firmly on the model. If you don't this can let paint run up under the tape of can leave a "fuzzy" edge on the stripe. Want everything to be sharp.
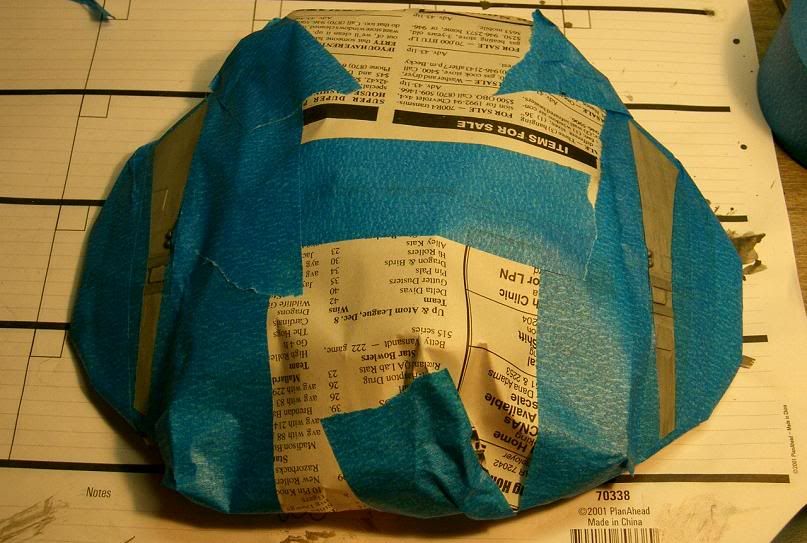
Here is the Raider with both masks in place and taped up with newspaper to keep any "overspray" for getting to any places that it's not ment to go. When you get ready to paint go over the edges of the tape again just to make sure none of it has pulled up around the area you are going to paint.
The easiest way to do this is to take the decal you cut out and place it where you want the stripe to go on the model and taking a mechanical pencil make yourself some small guide marks of where you want to place your mask to get the shape you want to end up with. Move slowly putting the mask down and check it by holding the decal over it to make sure the curves are right. Once it is where you want it then you can press the tape down firmly.
Now take your X-Acto knife again and go along and press your tape down around each bump so it is firmly on the model. If you don't this can let paint run up under the tape of can leave a "fuzzy" edge on the stripe. Want everything to be sharp.
Here is the Raider with both masks in place and taped up with newspaper to keep any "overspray" for getting to any places that it's not ment to go. When you get ready to paint go over the edges of the tape again just to make sure none of it has pulled up around the area you are going to paint.
TINMAN
-
Tinman
- Fallen Centurion - R.I.P.
- Posts: 231
- Joined: Thu Feb 21, 2008 11:41 am
- Location: Arkansas, USA
Re: Cylon Raider OOB Build
PAINTING:
Ok, out on the paint table, while useing an Airbrush 9 times out of 10 will give you a better paint job, I kinda wanted to see what I could do with this model just useing sparay cans. Our base coat was simple grey primer and the crescent stripes are standard flat black - both out of inexpensive spray paint cans I bought at the local Dollar Store. One trick you can do - after shaking the cans up good to mix the paint, let them soak in warm water for about an hour before you paint. This will help the paint flow out of the can more smoothly and you won't get those "blobs" of paint that a spray can sometimes spits out.
Hold the can about 2 feet from the model and spray using a back and forth motion till the area you are painting is covered. Don't just aim it straight at the model and start spraying. This has your can spraying at full speed before you pass over the model.
This is a close-up of one of the wings of the Raider right after painting. You can see the edges of the tape and how the area to be painted was only just painted enough to cover it.

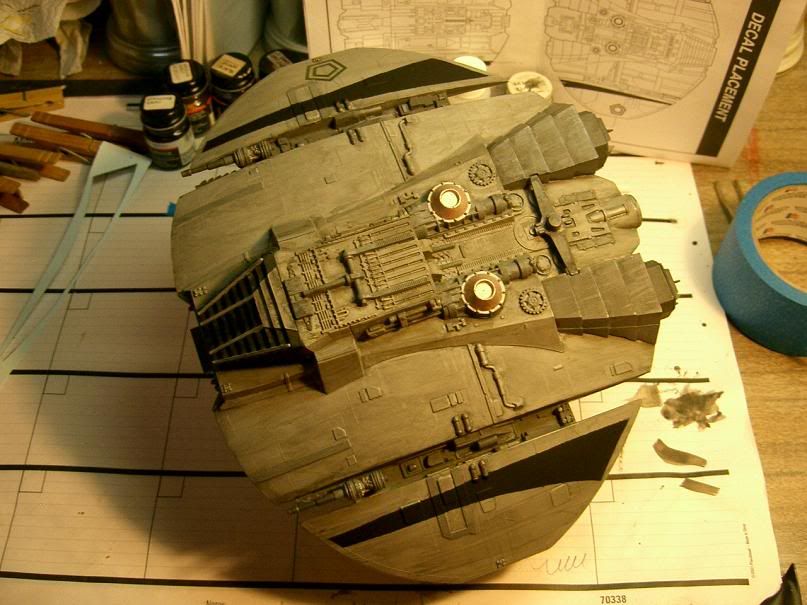
Here is a pic of the Raider with the paper and masking taken off after painting showing the crescents and how sharp their edges came out. Just like the decals.
NOTE: I did make one STUPID mistake. :frak: :frak: :frak: The tape pulled up one of the decals when I went to take it off after painting. I have spares to replace them with but someone out there with only one set of decals would be screwed big time. Word to the wise - wait till all the painting is done before putting the decals on.
Next time we will do some final weathering, detailing and putting the Dullcoat on.
Ok, out on the paint table, while useing an Airbrush 9 times out of 10 will give you a better paint job, I kinda wanted to see what I could do with this model just useing sparay cans. Our base coat was simple grey primer and the crescent stripes are standard flat black - both out of inexpensive spray paint cans I bought at the local Dollar Store. One trick you can do - after shaking the cans up good to mix the paint, let them soak in warm water for about an hour before you paint. This will help the paint flow out of the can more smoothly and you won't get those "blobs" of paint that a spray can sometimes spits out.
Hold the can about 2 feet from the model and spray using a back and forth motion till the area you are painting is covered. Don't just aim it straight at the model and start spraying. This has your can spraying at full speed before you pass over the model.
This is a close-up of one of the wings of the Raider right after painting. You can see the edges of the tape and how the area to be painted was only just painted enough to cover it.
Here is a pic of the Raider with the paper and masking taken off after painting showing the crescents and how sharp their edges came out. Just like the decals.
NOTE: I did make one STUPID mistake. :frak: :frak: :frak: The tape pulled up one of the decals when I went to take it off after painting.
I have spares to replace them with but someone out there with only one set of decals would be screwed big time. Word to the wise - wait till all the painting is done before putting the decals on.Next time we will do some final weathering, detailing and putting the Dullcoat on.
TINMAN
-
GoldCylon

- Founder
- Posts: 6946
- Joined: Fri Dec 02, 2005 3:02 pm
- Location: Sacramento
- Contact:
Re: Cylon Raider OOB Build
Great tutor, insight, and masking it off lesson. Too bad about the decals. Good lesson for all of us.
-
Red Eye
- Cylon Empire VIP & BYC.net Gallery Admin
- Posts: 4837
- Joined: Sat May 20, 2006 10:11 am
- Location: Germany
Re: Cylon Raider OOB Build
VERY informative indeed!
Thanks for sharing.
Thanks for sharing.
"There can be no survivors. So long as one human remains alive the Alliance is threatened."

-
gremlin
- Flight Leader
- Posts: 393
- Joined: Sun Nov 28, 2010 1:46 pm
Re: Cylon Raider OOB Build
first of all, thanks for the Cockpit links, just ordered on for my kit , i know i am a little late saying thanks but work has beenkeeping me away from my fun and even now i am working on 2 pcs
nexe this is a great build and the tips will help me with mine after i dig it out of the garage all my plastic models was put in there when i moved and after a year and a half, theare still there and i am hopeing i will get in there to clean it out so maybe my car can fit for the first time sence i got my house
nexe this is a great build and the tips will help me with mine after i dig it out of the garage
-
Tinman
- Fallen Centurion - R.I.P.
- Posts: 231
- Joined: Thu Feb 21, 2008 11:41 am
- Location: Arkansas, USA
Re: Cylon Raider OOB Build
Glad it is proving informative to my fellow modelers out there. That is always nice to hear.
I look forward to seeing pics of your models when done. Am always interested in what other modelers are doing and the results they get on their models.
I look forward to seeing pics of your models when done. Am always interested in what other modelers are doing and the results they get on their models.
TINMAN
-
gremlin
- Flight Leader
- Posts: 393
- Joined: Sun Nov 28, 2010 1:46 pm
Re: Cylon Raider OOB Build
just giveing everyone a heads up that i got my cockpit yeasurday and i will post pics soon
Who is online
Users browsing this forum: No registered users and 0 guests