Building my Cylon-Knight
-
sean

- Flight Leader
- Posts: 346
- Joined: Sat Dec 05, 2009 1:32 am
- Location: florida
-
Cylon-Knight

- Site Administrator
- Posts: 6432
- Joined: Wed Jul 23, 2008 9:32 pm
- Location: Kansas City
- Contact:
Re: Building my Cylon-Knight
sean - Cylon Kitty, Cylon Puppy and Cylon-Knight have discussed it and we agree you need to use your mad skills and work on your New-BSG Cylon Centurion build more. AWESOME STUFF! Or continue to be "the weapons master" and make the D.S. Gun - YOU ROCK!
"All Baseships are now in range to attack the Colonies."

-
Cylon-Knight
- Site Administrator
- Posts: 6432
- Joined: Wed Jul 23, 2008 9:32 pm
- Location: Kansas City
- Contact:
Re: Building my Cylon-Knight
Today I got two more bottles of Fiebing's Leather Dye (Black) for the gloves. At the shop (a shoe repair/leather shop) I noticed a poster of boots by the cash register while my total was ringing up... I was instantly drawn into a pair of "Cylon boots" (a look-a-like for the Georgia Lines Men boots). I pointed to it and blurted out "How much are these." 
He said they started at $149.00 for the ones with "heavy tread souls" - more like the screen used boots. Or he had another pair (pointed to another spot on the poster) that are $10 less with a lighter tread pattern on the souls. FYI for anyone that is totally at a loss for boots.
He said they started at $149.00 for the ones with "heavy tread souls" - more like the screen used boots. Or he had another pair (pointed to another spot on the poster) that are $10 less with a lighter tread pattern on the souls. FYI for anyone that is totally at a loss for boots.
"All Baseships are now in range to attack the Colonies."
-
GoldCylon

- Founder
- Posts: 6948
- Joined: Fri Dec 02, 2005 3:02 pm
- Location: Sacramento
- Contact:
Re: Building my Cylon-Knight
How much for the poster is my question :frak:
-
Cylon-Knight
- Site Administrator
- Posts: 6432
- Joined: Wed Jul 23, 2008 9:32 pm
- Location: Kansas City
- Contact:
Re: Building my Cylon-Knight
*Dr. Evil voice*
...It is...One Milllion Dollllers haha
haha
...It is...One Milllion Dollllers
"All Baseships are now in range to attack the Colonies."
-
Cylon-Knight
- Site Administrator
- Posts: 6432
- Joined: Wed Jul 23, 2008 9:32 pm
- Location: Kansas City
- Contact:
Re: Building my Cylon-Knight
HELLO CYLONS! Here is another update... and a tutorial  ENJOY
ENJOY
Backpack putty has begun! wheeee Thanks to my Cylon pal, nashslash for the suggestion for Milliput. Love it. (About $14 at Hobby Lobby) I can best describe it as "like Mighty Putty" - you cut a section of the two rolls of putty, mix them up like a ball of play dough and then mold it in place. Water smoothes it out and helps to shape it like clay. In three hours it is to be rock hard, sandable, drillable, paintable... and can accept chrome once primed as proved by nashslash's suit.
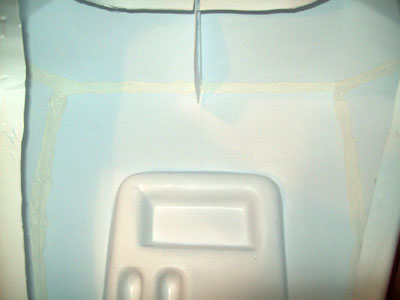
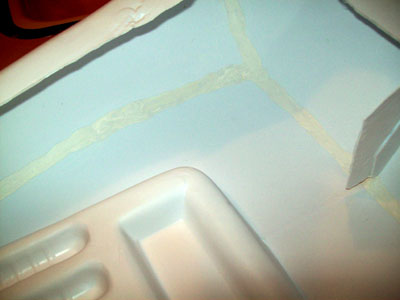
Here you can see the putty (just a little as it is white on white plastic! heehee). I got the white version of the putty. They have a yellow, gray and black described in the instructions.
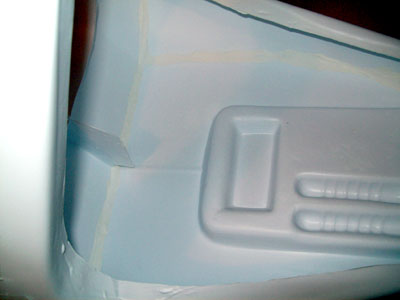
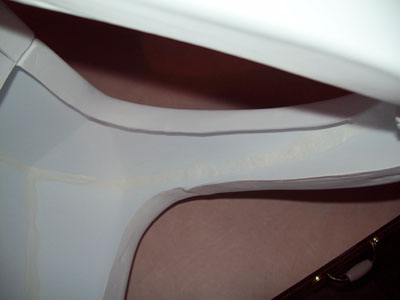
More seams - all covered up and starting to dry. Should be setup by midnight. Tomorrow I'll work on the outside of the backpack when I get the time.
_________________________
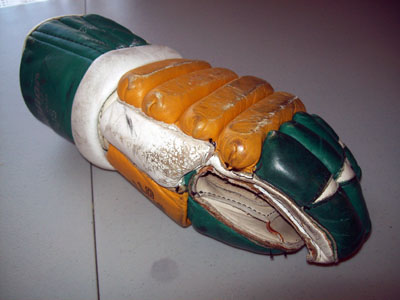
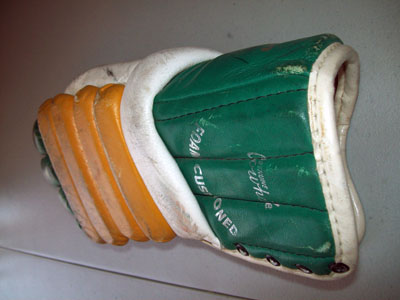
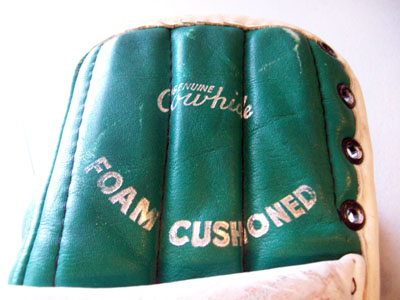
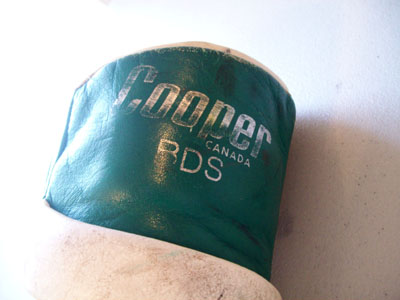
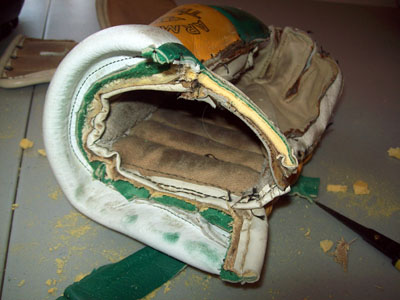
BACK TO THE GLOVES! Time to get my left glove converted.
9 photos of the left glove "before" cutting.


_________________________
Here is my "how to convert a Cooper Glove into a Cylon hand" photo tutorial!
Items to note:
-Use SHARP tools, it will make the cutting SO much easier and everything go quicker
-The inner foam in original 1960s/70s Cooper gloves is no doubt a crumbly mess (as you'll see in my pictures). I stopped every so often in the process to shake out the crumbs. Have a trash can handy for a good shake every so often and you'll avoid A LOT of clean up later.
-Be careful with those sharp tools! Those (AND CYLON HANDS!) and dangerous
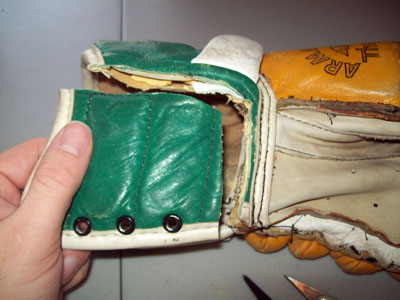
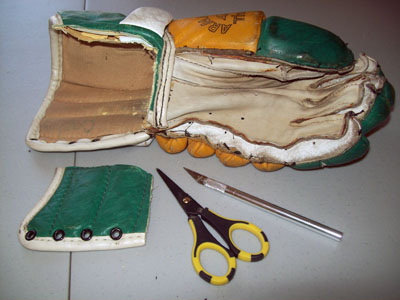
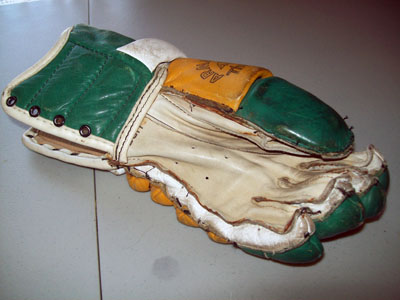
First cut on the open edge on the bottom of the cuff toward the thumb. Then cut 90 degrees toward the back of the glove and you'll get the shown section cut off. Also pictured are the tools I used. Some SHARP scissors, and my trusty X-ACTO knife with a new SHARP blade (Note: I didn't cut myself this time! *joy* I don't have the best history with my X-ACTO knife )
)
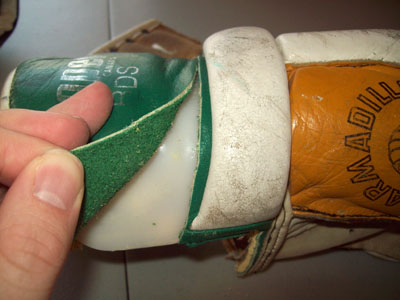
Now, move to the top of the cuff. And start to cut the leather as shown. Go all the way round the glove following the cut line as shown. There is a hard plastic insert in the cuff. You'll have to cut the top leather and then a matching cut on the inside lining (right photo).
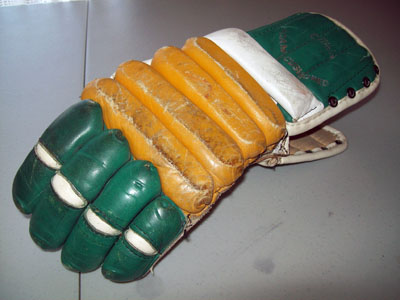
After the two cuts described above, you'll have the cuff totally removed from the glove.
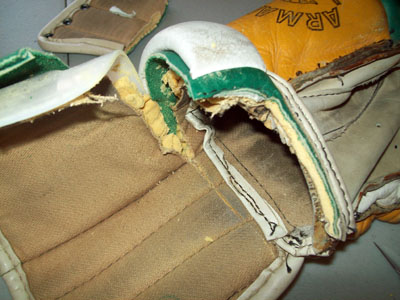
Then trim up inside a bit to get nice clean edges (photo on the right).
Congratulations! You are well on your way to getting your Cylon hands complete and being able to help with the final annihilation of the life form known as man! COOL huh!?
_________________________
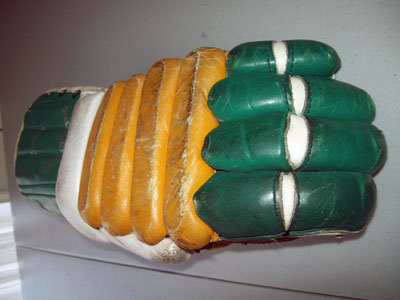
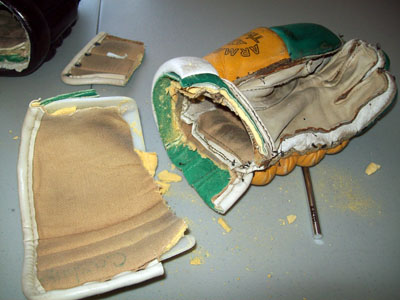
Okay, I have the cutting out of the way. It is time to see how it looks and fits now. Then start to dye the left glove.
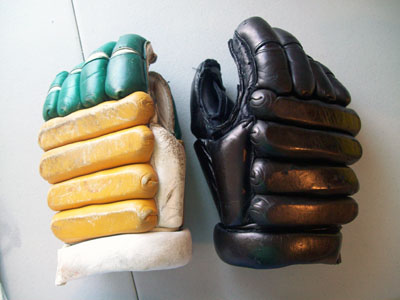
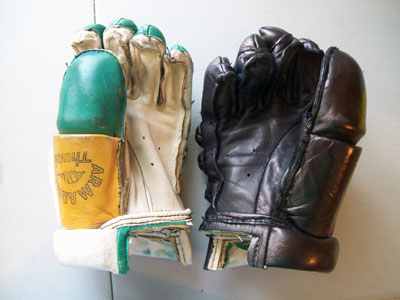
Here are the gloves. Left just cut, the right has had 3 or 4 good coats of dye at this point.
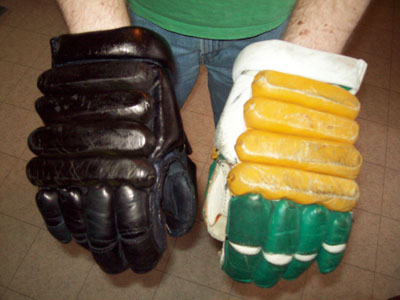
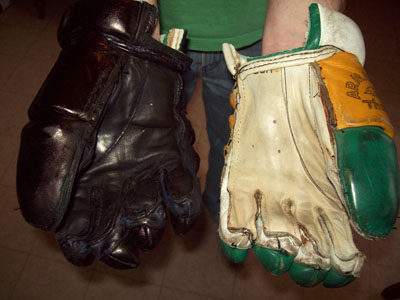
Wearing them in a "geek moment" (Thanks to my Cylon Wife for taking the photos - note - you can't take a photo while wearing hockey gloves! LOL)
LOL)
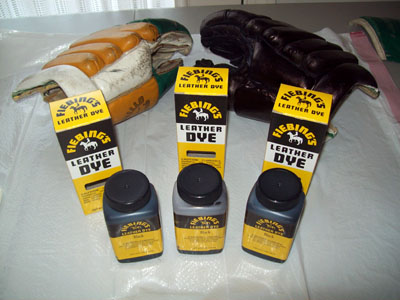
My two new bottle of Dye next to my first one (in the center - you can tell it is empty). You can get one full glove out of a bottle pretty much. However, good heavy coats and for any future touch ups, I got a third bottle to be safe. Also note the white trash bag "table cloth" I've added to my work area ... the leather dye is serious stuff and will stain your table (trust me ).
).
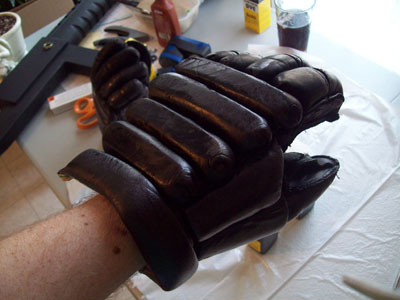
Right photo: Wearing the glove after the first coat. (I wear the glove while putting on the dye. If you do this expect dye to soak down onto your fingers / hand). Look, you can see the right glove in the background... AND... the coolest Cylon Rifle EVER too I have it handy incase any Colonials happen buy *ZAP*
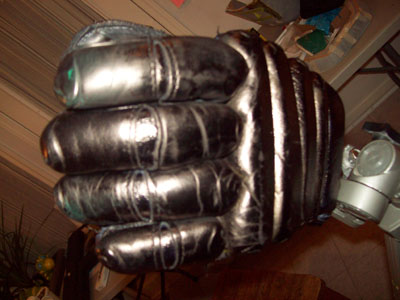
After the first round of dye. I put the glove on a tripod to let it dry. As you can see there are still a few spots to hit with the next coat of dye. The flash really shows the areas that need more attention... they are not as visible to the eye in normal room lighting. Thank you Mr. Flash!
So, now, I'm waiting for everything to dry.
Backpack putty has begun! wheeee Thanks to my Cylon pal, nashslash for the suggestion for Milliput. Love it. (About $14 at Hobby Lobby) I can best describe it as "like Mighty Putty" - you cut a section of the two rolls of putty, mix them up like a ball of play dough and then mold it in place. Water smoothes it out and helps to shape it like clay. In three hours it is to be rock hard, sandable, drillable, paintable... and can accept chrome once primed as proved by nashslash's suit.
Here you can see the putty (just a little as it is white on white plastic! heehee). I got the white version of the putty. They have a yellow, gray and black described in the instructions.
More seams - all covered up and starting to dry. Should be setup by midnight. Tomorrow I'll work on the outside of the backpack when I get the time.
_________________________
BACK TO THE GLOVES!
9 photos of the left glove "before" cutting.
_________________________
Here is my "how to convert a Cooper Glove into a Cylon hand" photo tutorial!
Items to note:
-Use SHARP tools, it will make the cutting SO much easier and everything go quicker
-The inner foam in original 1960s/70s Cooper gloves is no doubt a crumbly mess (as you'll see in my pictures). I stopped every so often in the process to shake out the crumbs. Have a trash can handy for a good shake every so often and you'll avoid A LOT of clean up later.
-Be careful with those sharp tools! Those (AND CYLON HANDS!) and dangerous
First cut on the open edge on the bottom of the cuff toward the thumb. Then cut 90 degrees toward the back of the glove and you'll get the shown section cut off. Also pictured are the tools I used. Some SHARP scissors, and my trusty X-ACTO knife with a new SHARP blade (Note: I didn't cut myself this time! *joy* I don't have the best history with my X-ACTO knife
Now, move to the top of the cuff. And start to cut the leather as shown. Go all the way round the glove following the cut line as shown. There is a hard plastic insert in the cuff. You'll have to cut the top leather and then a matching cut on the inside lining (right photo).
After the two cuts described above, you'll have the cuff totally removed from the glove.
Then trim up inside a bit to get nice clean edges (photo on the right).
Congratulations! You are well on your way to getting your Cylon hands complete and being able to help with the final annihilation of the life form known as man! COOL huh!?
_________________________
Okay, I have the cutting out of the way. It is time to see how it looks and fits now. Then start to dye the left glove.
Here are the gloves. Left just cut, the right has had 3 or 4 good coats of dye at this point.
Wearing them in a "geek moment" (Thanks to my Cylon Wife for taking the photos - note - you can't take a photo while wearing hockey gloves!
My two new bottle of Dye next to my first one (in the center - you can tell it is empty). You can get one full glove out of a bottle pretty much. However, good heavy coats and for any future touch ups, I got a third bottle to be safe. Also note the white trash bag "table cloth" I've added to my work area ... the leather dye is serious stuff and will stain your table (trust me
Right photo: Wearing the glove after the first coat. (I wear the glove while putting on the dye. If you do this expect dye to soak down onto your fingers / hand). Look, you can see the right glove in the background... AND... the coolest Cylon Rifle EVER too
After the first round of dye. I put the glove on a tripod to let it dry. As you can see there are still a few spots to hit with the next coat of dye. The flash really shows the areas that need more attention... they are not as visible to the eye in normal room lighting. Thank you Mr. Flash!
So, now, I'm waiting for everything to dry.
"All Baseships are now in range to attack the Colonies."
-
Cylon-Knight
- Site Administrator
- Posts: 6432
- Joined: Wed Jul 23, 2008 9:32 pm
- Location: Kansas City
- Contact:
Re: Building my Cylon-Knight
Got another key part to my build today, thanks to our own Darth Clayton!
My metal mesh skirting! I love it.
Cylon-Knight Mind APPROVED!
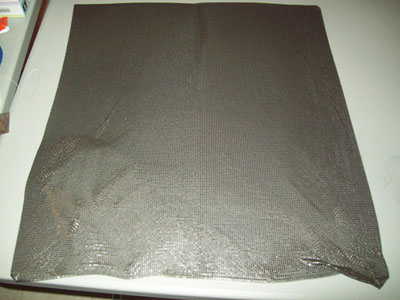
All Correct:
Size - 2' x 2'
Color - Gun metal gray
Material - Metal mesh
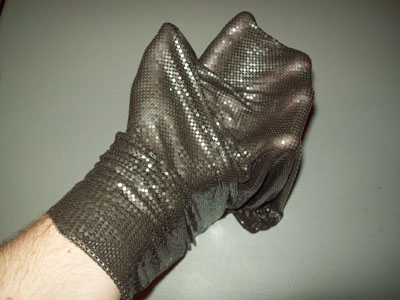
It is a metal FABRIC - folds up, etc.
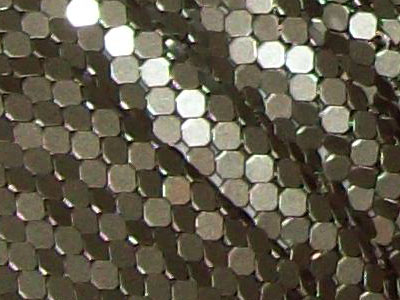
Close up photo of the detail. This is a NICE product.
Well worth it, and adds that little bit more of 1:1 to any build.
My metal mesh skirting! I love it.
Cylon-Knight Mind APPROVED!
All Correct:
Size - 2' x 2'
Color - Gun metal gray
Material - Metal mesh
It is a metal FABRIC - folds up, etc.
Close up photo of the detail. This is a NICE product.
Well worth it, and adds that little bit more of 1:1 to any build.
"All Baseships are now in range to attack the Colonies."
-
Cylon-Knight
- Site Administrator
- Posts: 6432
- Joined: Wed Jul 23, 2008 9:32 pm
- Location: Kansas City
- Contact:
Re: Building my Cylon-Knight
Anyone have any input on this Cylon Scanner product? Good? Bad?
http://www.hyperdynelabs.com/products_e ... oLight.php
http://www.hyperdynelabs.com/products_e ... oLight.php
"All Baseships are now in range to attack the Colonies."
-
GoldCylon
- Founder
- Posts: 6948
- Joined: Fri Dec 02, 2005 3:02 pm
- Location: Sacramento
- Contact:
Re: Building my Cylon-Knight
Good stuff over there, and don't worry about the out of stock notice, just contact the guy and he will make anything you need.Cylon-Knight wrote:Anyone have any input on this Cylon Scanner product? Good? Bad?
http://www.hyperdynelabs.com/products_e ... oLight.php
-
Red Eye

- Cylon Empire VIP & BYC.net Gallery Admin
- Posts: 4837
- Joined: Sat May 20, 2006 10:11 am
- Location: Germany
Re: Building my Cylon-Knight
C.O.R.A. had installed a scanner from Hyperdyne in his helmet.Cylon-Knight wrote:Anyone have any input on this Cylon Scanner product? Good? Bad?
http://www.hyperdynelabs.com/products_e ... oLight.php
It looks almost like the original with some red diffusion paper taped over it:
"There can be no survivors. So long as one human remains alive the Alliance is threatened."

-
Mr Fett
- Phalanx Leader
- Posts: 115
- Joined: Tue Feb 19, 2008 1:48 am
- Location: Michigan
Re: Building my Cylon-Knight
Wow, that does look awesome !!!
Red defusion paper? Is that like the red lighting gel material for theater or concert stage lights?
Red defusion paper? Is that like the red lighting gel material for theater or concert stage lights?
-
nashslash

- Flight Leader
- Posts: 340
- Joined: Wed Apr 30, 2008 8:09 pm
- Location: Milton Keynes UK
Re: Building my Cylon-Knight
www.battlefield-online.net
-
Cylon-Knight
- Site Administrator
- Posts: 6432
- Joined: Wed Jul 23, 2008 9:32 pm
- Location: Kansas City
- Contact:
Re: Building my Cylon-Knight
So, do you like it nash? Does it fit well inside the helmet/lid?nashslash wrote:my scanner was hyperdine too..
Is there still room to wear it? I know there is not much room to start, but is it built with that in mind?
"All Baseships are now in range to attack the Colonies."
-
GoldCylon
- Founder
- Posts: 6948
- Joined: Fri Dec 02, 2005 3:02 pm
- Location: Sacramento
- Contact:
Re: Building my Cylon-Knight
The Hyperdine I bought was the motion activated version that you couldn't wear the helmet once it was installed.
-
Cylon-Knight
- Site Administrator
- Posts: 6432
- Joined: Wed Jul 23, 2008 9:32 pm
- Location: Kansas City
- Contact:
Re: Building my Cylon-Knight
Yeah, I'm not interested in that display one. I need to wear my helmet.
I was looking at the one that can be worn... just looking for some customer feedback before dropping all that cash on one - let me know what you thought nashslash.
I was looking at the one that can be worn... just looking for some customer feedback before dropping all that cash on one - let me know what you thought nashslash.
"All Baseships are now in range to attack the Colonies."
Who is online
Users browsing this forum: No registered users and 1 guest