DIY Rotocasting

Rotational molding, also known as rotomolding, is a molding process for creating many kinds of mostly hollow items. The info is not specific to Classic Cylon Centurions, but SURE can be helpful for them and many, many others projects. Here you'll find various threads with great info from our members for the hobby of costuming.
Post Reply
User avatar
Big Al
Command Centurion
Posts: 1012
Joined: Tue Jun 07, 2011 3:09 am
Location: Las Vegas Nevada

Re: DIY Rotocasting

Post by Big Al » Wed Aug 03, 2011 11:20 pm

:cylongold: Ivar / Hellboy Matrix Mold 2

:cylon: Mold making 1 - cryptic cardboard base:

[attachment=4]hellboymold027uw.jpg[/attachment]

[attachment=3]hellboymold038jt.jpg[/attachment]

[attachment=2]hellboymold046ps.jpg[/attachment]

[attachment=1]hellboymold059ui.jpg[/attachment]

[attachment=0]hellboymold064zu.jpg[/attachment]

More to come

Attachments
hellboymold064zu.jpg
hellboymold059ui.jpg
hellboymold046ps.jpg
hellboymold038jt.jpg
hellboymold027uw.jpg


By Your Command

Image

User avatar
Big Al
Command Centurion
Posts: 1012
Joined: Tue Jun 07, 2011 3:09 am
Location: Las Vegas Nevada

Re: DIY Rotocasting

Post by Big Al » Thu Aug 04, 2011 7:54 am

:cylongold: Ivar / Hellboy Matrix Mold 3


:cylon: Mold making 2 - preparations for the first plaster side.

I used Russian made plastiline (I will call it clay here), but the water based clay could be better.

The first thing to do is to define the plane which separates the two mold sides. I'm not very precise here, as this clay I'm sculpting now will define the exact plane which will separate the two plaster molds. It's important to get it almost right, but there is no point to overwork on it, as the time to define the real (silicone) mold will come later.

The clay won't even touch the sculpt. In fact, I used cling film to cover the sculpt most of the time it's covered with clay - this way I will have much less clean-up to do later.
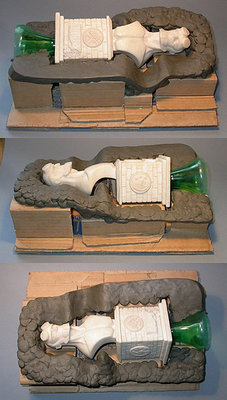
So, this is the clay what simulates the second half of the mold:
hellboymold077sq.jpg
:cylon: The next step is to use some more clay and to cover up the whole sculpt. This clay will be replaced with silicone later, it will become the one half of the silicone mold. So, the layer of clay should be not very thin and also not very thick. I think I used maybe too much clay here, could've got away with less silicone later...
Note the cling film and also various details which will later help to synchronize the plaster mold's sides together (round sockets) and also silicone mold and it's plaster cover (called mother mold).

It all will make sense later...
[attachment=2]hellboymold085mo.jpg[/attachment]
[attachment=1]hellboymold106te.jpg[/attachment]

Keys added

[attachment=0]hellboymold115oo.jpg[/attachment]

More to come
Attachments
hellboymold115oo.jpg
hellboymold106te.jpg
hellboymold085mo.jpg
By Your Command

Image

User avatar
Big Al
Command Centurion
Posts: 1012
Joined: Tue Jun 07, 2011 3:09 am
Location: Las Vegas Nevada

Re: DIY Rotocasting

Post by Big Al » Thu Aug 04, 2011 7:59 am

:cylongold:Ivar / Hellboy Matrix Mold 4


:cylon: Mold making 3 - first plaster side.
There is fabric inside the plaster to make it a little bit stronger:

[attachment=3]hellboymold120lr.jpg[/attachment]

[attachment=2]hellboymold135jw.jpg[/attachment]

[attachment=1]hellboymold144ck.jpg[/attachment]

[attachment=0]hellboymold159zs.jpg[/attachment]

More to come

Attachments
hellboymold159zs.jpg
hellboymold144ck.jpg
hellboymold135jw.jpg
hellboymold120lr.jpg
By Your Command

Image

User avatar
Big Al
Command Centurion
Posts: 1012
Joined: Tue Jun 07, 2011 3:09 am
Location: Las Vegas Nevada

Re: DIY Rotocasting

Post by Big Al » Thu Aug 04, 2011 8:27 am

:cylongold: Ivar / Hellboy Matrix Mold 5


:cylon: Mold making 4 - second clay side.
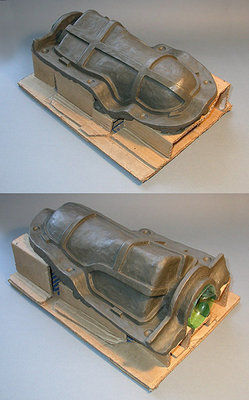
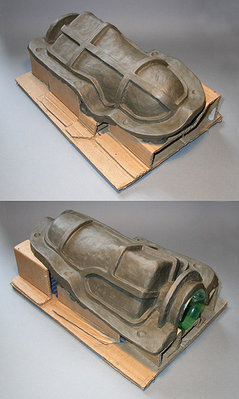
Mold and sculpt after removing from the cardboard base:

[attachment=2]hellboymold167gs.jpg[/attachment]

[attachment=1]hellboymold181wp.jpg[/attachment]

:cylon: Finished side 2. The paper towel tube will become the hole in the plaster cover to pour silicone in:

[attachment=0]hellboymold190ym.jpg[/attachment]

More to come

Attachments
hellboymold190ym.jpg
hellboymold181wp.jpg
hellboymold167gs.jpg
By Your Command

Image

User avatar
Big Al
Command Centurion
Posts: 1012
Joined: Tue Jun 07, 2011 3:09 am
Location: Las Vegas Nevada

Re: DIY Rotocasting

Post by Big Al » Thu Aug 04, 2011 8:39 am

:cylongold:Ivar / Hellboy Matrix Mold 6


:cylon: Mold making 5 - second plaster side.
Here is my mold after the second plaster side was made...

[attachment=5]hellboymold207cs.jpg[/attachment]

[attachment=4]hellboymold213ac.jpg[/attachment]

:cylon: ...and after some clean up:

[attachment=3]hellboymold222rm.jpg[/attachment]

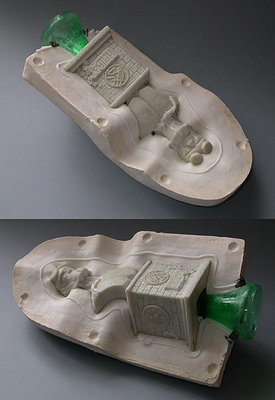
:cylon: Very important thing is to use some vaseline (or similar agent) on the areas where two plaster sides will touch each other before making the second plaster side. (It's the area with round sockets on the next pictures.) Without it there will be one monolithic plaster shell which is impossible to open. I used some and with the help of screwdriver it opened easily!

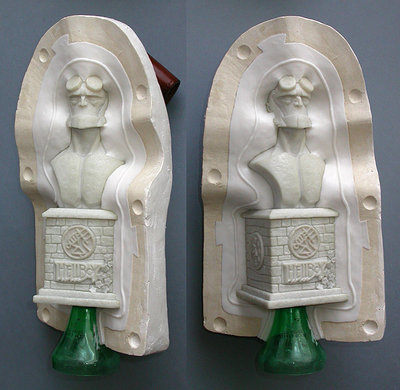
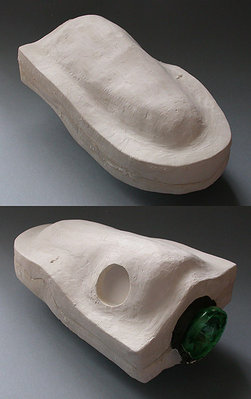
:cylon: Here is one finished plaster side after I removed all the now unnecessary clay from the inside:

[attachment=2]hellboymold249ww.jpg[/attachment]

[attachment=1]hellboymold259uw.jpg[/attachment]

[attachment=0]hellboymold268qt.jpg[/attachment]

:cylon: it's clever to measure how much clay went for filling the mold, the same amount of silicon is later needed.

The next step is to prepare the other plaster side for silicone pouring...

More to come

Attachments
hellboymold268qt.jpg
hellboymold259uw.jpg
hellboymold249ww.jpg
hellboymold222rm.jpg
hellboymold213ac.jpg
hellboymold207cs.jpg
By Your Command

Image

User avatar
Big Al
Command Centurion
Posts: 1012
Joined: Tue Jun 07, 2011 3:09 am
Location: Las Vegas Nevada

Re: DIY Rotocasting

Post by Big Al » Thu Aug 04, 2011 8:54 am

:cylongold: Ivar / Hellboy Matrix Mold 7


:cylon: Mold making 6 - preparations for the first half of the silicone mold.

Now it's time to figure out the exact line which will separate the two silicone mold's sides. It was roughly defined before plaster cover was made, but now it must be finalized as precisely as possible.

Here is the second side of the mold with the bust and silicone simulating clay.
Note that although I'm cleaning up and smoothing the clay, the cling film is still there. The reason for it is simple - I'd really like to keep the clean-up minimal as I will keep my original sculpt.

[attachment=4]hellboysilicone026ly.jpg[/attachment]

Then I removed my sculpt and cut the cling film, so there is some 2 mm area around the bust where clay will touch the sculpt.

:cylon: This cling film use is not mandatory, it was something I liked to do. Sometimes it's not as easy to remove the sculpt, sometimes the cleaning up is not a problem. So it depends.

[attachment=3]hellboysilicone038uq.jpg[/attachment]

:cylon: Here the sculpt is back in the mold, the cling is invisible and the silicone-to-be is almost defined:

[attachment=2]hellboysilicone042yh.jpg[/attachment]

[attachment=1]hellboysilicone058jm.jpg[/attachment]

:cylon: I haven't written about the most important aspect here - how exactly my sculpt was separated to two mold's sides. I wanted the front of the Hellboy and two sides of the base to be on one side of the mold, the backside of the Hellboy and another two sides of the base in another. That's the reason why this mold is somehow askew... There should be smallest under-cuts possible on the mold and of course the mold must be such that it's possible to remove the cast from it. It's different every time.

:cylon: And now the final addition - a groove around the sculpt. It helps to synchronize two silicone mold sides, it also helps to keep casting material inside the silicone mold.

[attachment=0]hellboysilicone067jr.jpg[/attachment]

More to Come!

Attachments
hellboysilicone067jr.jpg
hellboysilicone058jm.jpg
hellboysilicone042yh.jpg
hellboysilicone038uq.jpg
hellboysilicone026ly.jpg
By Your Command

Image

User avatar
Big Al
Command Centurion
Posts: 1012
Joined: Tue Jun 07, 2011 3:09 am
Location: Las Vegas Nevada

Re: DIY Rotocasting

Post by Big Al » Thu Aug 04, 2011 9:14 am

:cylongold: Ivar / Hellboy Matrix Mold 8


:cylon: It was funny to read that my tutorial is more complicated than what they teach in American college...
When I decided that I want to try this process, I searched, read and watched as many mold making tutorials as I could find. As I don't have the exact same materials here, I tried (like some sort of MacGyver) to synthesize my own version. I bet not many people use Sprite bottle in mold making...

Basically there are two ways of making silicone molds - box mold and matrix mold. On box mold making sculpture is basically surrounded with some sort of border or box, lower half is sinked into clay and silicone is poured over it all. Then flip over, some clean-up, a little bit vaseline and another silicone pour. Box mold is much quicker and easier to make but it takes much more silicone. As much as I can tell, it's ok for smaller details like hands but is not as good and stable for bigger sculpts as matrix mold, where plaster cover

:cylon: Mold making 7 - first silicone side

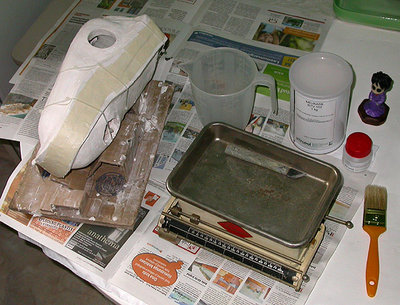
Silicone I used is white, two component 1:20.

[attachment=4]hellboysilicone073bc.jpg[/attachment]

:cylon: Note the small hole inside the plaster on the next photograph - I drilled it so the air had another place to come out of the mold. When I saw the silicone coming through it, I knew this part of the mold is filled with silicone.

[attachment=3]hellboysilicone084xi.jpg[/attachment]

:cylon: On the next day:

[attachment=2]hellboysilicone091vr.jpg[/attachment]

[attachment=1]hellboysilicone107vf.jpg[/attachment]

:cylon: After some clean-up, one side of the mold is ready!

[attachment=0]hellboysilicone116bg.jpg[/attachment]

Stay Tuned for more!

Attachments
hellboysilicone116bg.jpg
hellboysilicone107vf.jpg
hellboysilicone091vr.jpg
hellboysilicone084xi.jpg
hellboysilicone073bc.jpg
By Your Command

Image

User avatar
Big Al
Command Centurion
Posts: 1012
Joined: Tue Jun 07, 2011 3:09 am
Location: Las Vegas Nevada

Re: DIY Rotocasting

Post by Big Al » Thu Aug 04, 2011 9:28 am

:cylongold:Ivar / Hellboy Matrix Mold 9


:cylon: As it was the first time for me to try mold making and as I tried to document the whole process with my camera, I was trying to make it as clean and perfect as I could. Don't think my next mold will look as good... :grin:

:cylon: Mold making 8 - second silicone side

Here is second plaster side (actually the one I made first) after the clean up:

[attachment=1]hellboymold268qt.jpg[/attachment]

:cylon: I repaired the plaster sides a little after the clean up, as there were some cracks inside and also the opening with screwdriver left some disintegrating marks to the mold's borders.

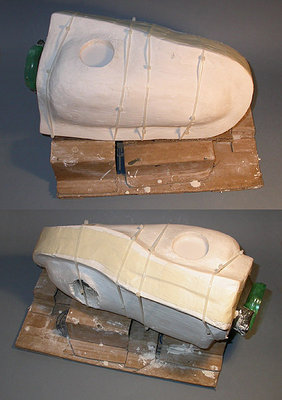
Here is the closed mold with another silicone side inside and curing:

[attachment=0]hellboysilicone126vb.jpg[/attachment]

:cylon: Again - it's very important to cover the already finished silicone mold with vaseline! Not the whole mold of course, but the visible area between plaster and the sculpt. Very thin layer is all what is needed. Without it there is only one way to open the mold and to get the sculpt out - exacto knife.

Good mold making silicone can go through very small openings. That's the point... :grin: So, it's very important to seal the mold very thightly. I couldn't find plaster bandages, maybe I just didn't look around enough. So I used simple masking tape in several layers. And I'm happy that it worked! Some of the silicone came through from between the plaster sides but it didn't came through the paper tape.

It's visible on the photo that this time silicone on the hole doesn't seem as smooth as the first time. The reason is simple - I had some leftover silicone from the first silicone session from the jug and from the first mold. The amount of silicone I mixed this time was maybe too exact. So I used scissors, cut some of them to the small pieces and sinked to the liquid silicone through the hole in the plaster. Recycling!

Don't Change that Dial! :wink:


Attachments
hellboysilicone126vb.jpg
hellboymold268qt.jpg
By Your Command

Image

User avatar
Big Al
Command Centurion
Posts: 1012
Joined: Tue Jun 07, 2011 3:09 am
Location: Las Vegas Nevada

Re: DIY Rotocasting

Post by Big Al » Thu Aug 04, 2011 9:39 am

:cylongold: Ivar / Hellboy Matrix Mold 10


:cylon: Mold making 9 - matrix mold is ready.

[attachment=3]hellboysilicone135ix.jpg[/attachment]

[attachment=2]hellboysilicone143dr.jpg[/attachment]

[attachment=1]hellboysilicone157wt.jpg[/attachment]

[attachment=0]hellboysilicone166lm.jpg[/attachment]

More to come! :salute:

Attachments
hellboysilicone166lm.jpg
hellboysilicone157wt.jpg
hellboysilicone143dr.jpg
hellboysilicone135ix.jpg
By Your Command

Image

User avatar
Big Al
Command Centurion
Posts: 1012
Joined: Tue Jun 07, 2011 3:09 am
Location: Las Vegas Nevada

Re: DIY Rotocasting

Post by Big Al » Thu Aug 04, 2011 9:44 am

:cylongold: Ivar / Hellboy Matrix Mold 11


:cylon: Mold making 10 - the diagram.

When I was posting my sculpting and mold making progress pictures on Hellboy board, I had hard time to explain to one board member how there will be no cling film marks on the casts. So I drew the next diagram:

[attachment=0]skeem5on.jpg[/attachment]

More to come! :shock:

Attachments
skeem5on.jpg
By Your Command

Image

User avatar
Big Al
Command Centurion
Posts: 1012
Joined: Tue Jun 07, 2011 3:09 am
Location: Las Vegas Nevada

Re: DIY Rotocasting

Post by Big Al » Thu Aug 04, 2011 9:53 am

:cylongold: Ivar / Hellboy Matrix Mold 12

:cylon: have some problems with casting - I just don't have decent resin. I tried one my friend is using when making canoes, but the smell was just awful, it looked ugly and it looks like it didn't cure correctly, at least the surface looked strange.
At the moment all the castings I have are from resin plaster. It's stronger than usual plaster but it's still a plaster, so it's very heavy (nice thing!) and not as strong as resin or plastic.

Here are some casting photographs:

Plaster inside the mold:

[attachment=6]hellboycast015oh.jpg[/attachment]

:cylon: Mold is open:

[attachment=5]hellboycast021zv.jpg[/attachment]

:cylon: The first copy and the white Cernit clay original. It's interesting how differently they photograph:

[attachment=4]hellboycast031yi.jpg[/attachment]

[attachment=3]hellboycast04a6yc.jpg[/attachment]

[attachment=2]hellboycast04b7gu.jpg[/attachment]

[attachment=1]hellboycast066eu.jpg[/attachment]

[attachment=0]hellboycast088rf.jpg[/attachment]

Stay Tuned! :nah:

Attachments
hellboycast088rf.jpg
hellboycast066eu.jpg
hellboycast04b7gu.jpg
hellboycast04a6yc.jpg
hellboycast031yi.jpg
hellboycast021zv.jpg
hellboycast015oh.jpg
By Your Command

Image

User avatar
Big Al
Command Centurion
Posts: 1012
Joined: Tue Jun 07, 2011 3:09 am
Location: Las Vegas Nevada

Re: DIY Rotocasting

Post by Big Al » Thu Aug 04, 2011 10:03 am

:cylongold:Ivar / Hellboy Matrix Mold 13


:cylon: It took me several months to work on it, I made it on my spare time. In fact, I think base took more time than actual bust...

I paid way too much for the silicone. Other stuff was relatively cheap.

:cylon: What to do:
Look at the post "Ivar / Hellboy Matrix Mold #11", there is a diagram of what the mold making steps are.

:arrow: 1: make a sculpt
I used polymer clay named Cernit, most people use Super Sculpey, waxes and sometimes additional materials like metal for some details.

:arrow: 2: make a mold to take several copies of the sculpt.
I used materials I could get, instead of cardboard one can use whatever materials, foamcore, clay, whatever is easier and quicker. And instead of plastiline some water based clay.

:arrow: 3:The reason I made matrix mould where plaster surrounds silicone is simple - silicone is expensive and soft, so plaster helps to save materials and hold the form.

Be right back! :salute:
By Your Command

Image

User avatar
Big Al
Command Centurion
Posts: 1012
Joined: Tue Jun 07, 2011 3:09 am
Location: Las Vegas Nevada

Re: DIY Rotocasting

Post by Big Al » Thu Aug 04, 2011 10:08 am

:cylongold:Ivar / Hellboy Matrix Mold 15


:cylon: And - at last, some progress with resin! Now it's time for putty, primer and color...

[attachment=0]hellboycast09cernitplasterresi.jpg[/attachment]

Still More! :cool:

Attachments
hellboycast09cernitplasterresi.jpg
Last edited by Big Al on Thu Aug 04, 2011 2:33 pm, edited 1 time in total.
By Your Command

Image

User avatar
Big Al
Command Centurion
Posts: 1012
Joined: Tue Jun 07, 2011 3:09 am
Location: Las Vegas Nevada

Re: DIY Rotocasting

Post by Big Al » Thu Aug 04, 2011 12:40 pm

:cylongold: Ivar (Tools)


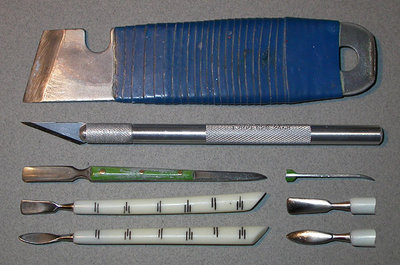
:cylon: I have a 12-part steel sculpting tool set I got from Ebay. But I still love the old Soviet era manicure tools I found at home when I first tried polymer clay and was looking around for some tools. They are lightweight and very nice to use. Only thing I did with them - I modified this green tool's other end to look like ski, it's good for cleaning up sharp lines.

I'm doing 99% of my sculpting with the tools on this photo. Werewolf's fur and stone base's textures are mostly made with second tool from bottom, the one with more straight end. The green one is good for carving clay too.

[attachment=0]tools28lh.jpg[/attachment]

For some reason I think I may be the only person on this planet who sculpts with manicure tools...


___________________________________________________________________________________________________________________________________________________________________________________

:cylon: That's it for Ivar! I decided to re-post this thread because it is such a great presentation on this subject I didn't wan't to take the chance just posting a link and haveing it go bad after a while like so many others do from old threads.....Some of the other stuff Ivar has posted is missing but this one was pretty complete I think 1 or 2 pics missing, but he took so many that it is still good.

Here is the link again if you want to see the original thread and comments on Concept Art.Org There are a couple of Animated spinning gif's but the file size is to big to post. I'm going to play with them latter to see if I can get them to work
Attachments
tools28lh.jpg
By Your Command

Image

User avatar
Big Al
Command Centurion
Posts: 1012
Joined: Tue Jun 07, 2011 3:09 am
Location: Las Vegas Nevada

Re: DIY Rotocasting

Post by Big Al » Thu Aug 04, 2011 2:30 pm

:cylongold: Ivar Hellboy Cast Complete and Painted

Image
By Your Command

Image

Post Reply

Return to “Rotocasting”

Who is online

Users browsing this forum: No registered users and 7 guests