Tips, tricks, inside secrets, help, sources, items used on making the Cylon Centurion suit to wear. Tell us your story, how you came about collecting your parts to a Centurion, or if you own a complete Centurion costume.
-
mad-Cylon
- Patrol Member
- Posts: 57
- Joined: Fri Dec 19, 2014 6:41 pm
- Location: Australia
Post
by mad-Cylon » Thu Jan 29, 2015 9:28 pm
I have finished one set of armour with the resin, I was off on my estimate of number of coats required. I initially thought one inside and 2 outside coats would be enough, however this was not enough to make it sufficiently rigid. I ended up applying 6 coats being 3 inside and 3 outside. I was careful to ensure the correct shape of the various pieces primarily with sticky tape until the first coat of the resin dried.
I used gloves, eye protection and respirator as the resin is nasty. The next step is to file / sand down imperfections then apply spray putty which should fix most issues and then body filler for final shape, Looks like the helmet needs the most work. Then I will resin the next two sets and repeat.
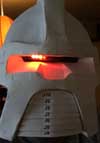
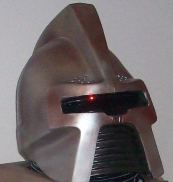
The cylon eye will not fit behind the visor, not without a lot of mucking around I was going to attach it to the top of the visor before the slit for the eye piece. Probably not accurate but I will see how it goes and will post for comment.

taking shape and is exciting...
-
Attachments
-
 Viewed 1581 times")
-
 Viewed 1581 times")
- 6 coats of resin makes it nice and rigid
-
 Viewed 1581 times")
- Drying in the sun after the final resin
Time for a polish I like to be Nice and Shiny

-
RAM_Doubler
- Patrol Leader
- Posts: 78
- Joined: Sun Nov 30, 2014 6:43 pm
- Location: Kansas City
Post
by RAM_Doubler » Tue Feb 17, 2015 9:54 pm
Great work! Looking forward to see more pics.
I'm at about the same point in my build...and building one is enough work, 3 is

insane!
-
mad-Cylon
- Patrol Member
- Posts: 57
- Joined: Fri Dec 19, 2014 6:41 pm
- Location: Australia
Post
by mad-Cylon » Mon Feb 23, 2015 2:56 pm
Looks like my last post didn't update, more than likely me rushing. All it was saying was that I would be away for a few weeks, was cruising around the South Pacific (it was awesome) but didn't find any Cylons. Now back to my project.
After applying x6 coats of resin I then sanded and filed all the rough edges down, the helmets needed the most work. I then spray puttied one set (light blue) and simply undercoated another set (dark blue) just to see if there is a difference with the bond with the body filler. The third set I will wait to see which method is best but we be prepped in yellow, the different colours will help me keep track of which piece belongs to which set and size.
This is my first attempt at using body filler so yet another learning curve but still fun. I have used way too much body filler and also wasted a lot by mixing to much. I have now learnt to mix a very small amount and apply it in small sections (not to cover the entire piece) and to also only apply in thin layers to up build bulk if required. This way takes a lot of time but this is the method I am now using for the second set (undercoated dark blue).
Now I have a big job sanding down and shaping. the mouth piece on the helmet and the chest plate is going to be a challenge.
I have included a few photos but will post all pieces of first set with body filler before sanding, the first attempt is pretty rough but will be a good comparison. will post again in a few days. any advice gladly accepted.
Oh I think I know why my last post didn't update, when I hit submit for this post it said I needed to be logged in (which I was) but mustn't have read that message last time.
-
Attachments
-
 Viewed 1526 times")
- Light Blue spray putty and some body filler applied
-
 Viewed 1526 times")
- Applying body filler first attempt
-
 Viewed 1526 times")
- Fit for a Smurf - Dark Blue undercoat
Time for a polish I like to be Nice and Shiny
-
Cylon-Knight
- Site Administrator
- Posts: 6396
- Joined: Wed Jul 23, 2008 9:32 pm
- Location: Kansas City
-
Contact:
-
Post
by Cylon-Knight » Mon Feb 23, 2015 9:54 pm
Smurf Cylon, awesome!
Looking good.
For the posting oddness - When you log in the site will time out if you are idle for 20 minutes to save resources (I think it is 20, I'd have to double check to be certain). So, if you stated a post, walked away for an hour, came back and pushed submit it would be lost. Maybe that's what happened?
"All Baseships are now in range to attack the Colonies."

-
RAM_Doubler
- Patrol Leader
- Posts: 78
- Joined: Sun Nov 30, 2014 6:43 pm
- Location: Kansas City
Post
by RAM_Doubler » Mon Feb 23, 2015 10:00 pm
Different colors to tell the sets apart - simple and brilliant, well done!
I'm at the exact stage you are at the moment, and I know exactly what you mean about wasting material. I learned to mix tiny portions of epoxy resin or risk throwing away a cup that's 1/4-full of sticky, unusable goo. An expensive lesson to learn

I'm using Smooth-Cast 321 resin so I can apply it indoors, but it gives about the same result as bondo. I did have someone recommend adding what's called a fairing filler to my epoxy resin. It thickens the resin enough that you can make a paste so you can build up low spots and shape the curves. Only used it a bit on the chest piece so far, but I'm liking it pretty well...and it's easy to sand.
Good luck - looking forward to seeing more of your progress!
-
GoldCylon
- Founder
- Posts: 6945
- Joined: Fri Dec 02, 2005 3:02 pm
- Location: Sacramento
-
Contact:
-
Post
by GoldCylon » Thu Mar 05, 2015 9:09 am
Good progress and great work looks good.
-
mad-Cylon
- Patrol Member
- Posts: 57
- Joined: Fri Dec 19, 2014 6:41 pm
- Location: Australia
-
mad-Cylon
- Patrol Member
- Posts: 57
- Joined: Fri Dec 19, 2014 6:41 pm
- Location: Australia
-
Cylon-Knight
- Site Administrator
- Posts: 6396
- Joined: Wed Jul 23, 2008 9:32 pm
- Location: Kansas City
-
Contact:
-
Post
by Cylon-Knight » Sat Apr 04, 2015 9:56 pm
Looking GREAT!!! Another Centurion is well under way - good job.

One advice item I have would be on Velcro. I used "normal" sticky back Velcro and had issues. Over time the adhesive eventually gave out on the fake leather my belt has and it creates a sticky trail as it slowly started to move - slide down. Like a snail trail of slime. However, if I used "Industrial Strength" Velcro that has held up much better - no slime. Just one tip to watch out for over time. You might go to suit up next year and your Velcro might have shifted.
"All Baseships are now in range to attack the Colonies."
-
mad-Cylon
- Patrol Member
- Posts: 57
- Joined: Fri Dec 19, 2014 6:41 pm
- Location: Australia
Post
by mad-Cylon » Sun Apr 05, 2015 4:11 am
Thanks Cyln-knight, I never considered that. The car polish didn't work to seal the chrome as it immediately turned grey. Working on the backpack now and the skirt. Have an idea for the backpack which isn't screen accurate but will post anyway hopefully tomorrow.
Time for a polish I like to be Nice and Shiny
-
rustycylon
- Squadron Leader
- Posts: 583
- Joined: Sun Apr 29, 2012 7:35 am
- Location: West Midlands UK
Post
by rustycylon » Sun Apr 05, 2015 4:25 am
most chrome paints tend to go dull when lacquered or sealed. Can you get alclad2 paint in your country
-
mad-Cylon
- Patrol Member
- Posts: 57
- Joined: Fri Dec 19, 2014 6:41 pm
- Location: Australia
Post
by mad-Cylon » Tue Apr 07, 2015 7:00 am
Hiya Rustycylon, looks like that isn't available here. I have a few more things to try and will see how it holds up during its first comic con next week otherwise may redo them in a satin Silver......
Time for a polish I like to be Nice and Shiny
-
OMEGA3
- Patrol Leader
- Posts: 70
- Joined: Sat Jan 24, 2015 11:55 pm
Post
by OMEGA3 » Fri Apr 10, 2015 11:39 pm
OUTSTANDING is the only comment I can add to your GREAT work !
KEEP ONE GOOD EYE ON CENTURION ! Everyone in the Empire should try this.... Maybe.... LOL

-
mad-Cylon
- Patrol Member
- Posts: 57
- Joined: Fri Dec 19, 2014 6:41 pm
- Location: Australia
-
Cylon-Knight
- Site Administrator
- Posts: 6396
- Joined: Wed Jul 23, 2008 9:32 pm
- Location: Kansas City
-
Contact:
-
Post
by Cylon-Knight » Sat Apr 11, 2015 8:10 pm
"All Baseships are now in range to attack the Colonies."
Who is online
Users browsing this forum: No registered users and 4 guests